 Radiator Bracket Installation...
...right / left radiator brackets
...10mm wrench
...12mm wrench
...3/8x3/4x36" Hi density automotive grade foam tape
...Install the brackets using the original RX-7 radiator bolts. NOTE:...Our radiator brackets attach to the same points as the original RX-7 radiator, but move the bottom of our radiator forward to a vertical
position. The right and left brackets are almost mirror images of each other, except that the driver's side bracket has a wider wing seal on it's
lower outward side.
...Part of the plastic underbelly tray below the radiator should be removed between the steering rack and the bottom of the radiator. This modification more area for the hot air exiting
the radiator to escape the engine compartment.
Radiator Installation...
...Radiator
...radiator aluminum upper seal panel
...10mm wrench
...Drill & 5/16" drill bit
...2x2x36" low density foam seal material
...The foam material seals the area between the bottom of the radiator and the plastic underbelly tray. Sealing this area prevents cool air from bypassing under the radiator.
Cut the foam seal material as needed to fit.
...Slip the radiator into the installed radiator brackets (slight lubrication of the foam strips may be required. The hi-density foam should prevent any metal to metal contact).
...Place the upper aluminum radiator seal in position at the top/front of the radiator (located by the existing hole at the passenger side/front of the panel).
Using the seal plate as a template, mark and drill the other mounting hole along the front edge of the seal panel.
...secure the seal panel using existing & drilled holes.
OPTIONAL- Electric Fan Install...

If you would like to go with an electric fan, it's tough to beat one from a Ford Taurus. They are very common, easy to find in the wrecking yards, the right size and easy to trim and adapt to our rad brackets. Pretty simple/straight-forward fitment mods are required...here's a pic of an install on our LS1 radiator...
Radiator Hose Installation...
...LS1 engine hoses...
............we suggest starting with the oem style hoses for the engine in a Camaro, just get them at your local parts store.. "Branched" versions of the hoses are also available, making it easy to plumb in a steam line if your radiator does not have a provision for it.
...(4) hose clamps
...Trim the hoses to length & install. Make sure that the lower hose has a spring type insert inside to prevent hose collapse at high RPMs.
Radiator Cap...We suggest using a Stant 18lb cap, PN# 10234, a nice moderatly high pressure cap with the needed seal for proper coolant recovery. Other brand caps can be used, generally something that will fit an '85 Chevy car or truck should fit our radiator's neck. Higher pressure racing caps are out there, but we do not recommend them for a daily driver, as they are designed for vehicles with a much shorter maintenance interval, and will not recover coolant properly over time.
NOTE:...If you want to use your stock RX-7 radiator, it will need to be re-located farther forward to a more vertical position. Some people have had success with the stock radiator by removing a pie shaped section from the sheetmetal the radiator bolts to, with the result of swinging the bottom of the radiator forward. Others have used radiators from different applications, using fabricated brackets. Even stock LT-1 Camaro radiators have been installed by denting in the sheetmetal "frame-rail" sections of the RX-7 to make some additional room. Whatever solution you decide on, if you live in one of the warmer climates such as Arizona or Florida, you will need to pay extra attention to directing every last bit of air drawn in by the fan THROUGH the radiator, instead of around it. This means sealing off all the paths above, below, and around the rad with sheetmetal, cardboard, or foam. REMEMBER...the RX-7 has a small engine compartment with minimal exit paths for the hot air to escape from. If the air can't get out fast enough from the rear and bottom of the engine compartment, it will simply go around the rad or fan to the low pressure area in front, reducing the amount of fresh cool air drawn in. Our radiator kits use the largest possible radiator without requiring major modifications, and our radiator brackets are engineered to seal off the paths around the rad without further fabrication.
Heater core plumbing...The RX-7 uses standard 5/8" heater hoses, while the Chevy used a combination of (1) 5/8" and (1) 3/4" hose. With a little silicone spray, standard 5/8" heater hose can be slipped over the Chevy's 3/4" fitting, allowing you to use all 5/8" hose for heater core plumbing. Proper hose routing is as follows...
...RX-7 upper heater hose outlet on firewall- plumb to the larger 3/4" Chevy fitting.
...RX-7 lower heater hose outlet on firewall- plumb to the smaller 5/8" Chevy fitting.
...LS1 5/16" vent tube- plumb into the upper radiator hose or radiator's inlet tank.
Sway Bar Spacer Installation...We use aluminum "sway bar spacers" to re-locate the Rx-7's stock sway bar 3/4" lower and about 1/2" forward of it's stock location, allowing the sway bar to clear the LS1's oil pan. The spacers simply bolt between the sway bar and it's original chassis mounting points. Use the supplied socket head bolts to secure the spacers to the chassis (using the countersunk holes), with the threaded holes forward. This leaves a flat surface with threaded holes for re-attaching the sway bar in it's new forward location. Be sure to use anti-seize on all the threads.
The stock RX-7 fuel system uses an in-tank pump, connected to the rotary engine's injector fuel rail, with a rail mounted pressure regulator routing excess fuel flow back to the fuel tank thru the fuel return line. The Camaro/Firebird version of the LS1 used a fuel supply system that located the fuel pump, fuel pressure regulator, and fuel return plumbing entirely within the fuel tank, requiring only a fuel supply line (no return line) connected to the LS1 fuel rail. In order to insure that your conversion is 100% smog legal, your RX-7 will need to adopt the LS1's in-tank pump/regulator/return arrangement.
 If your RX-7 does not need to be smog legal within the letter of the law, there is an easier solution....the LS1 Corvette fuel filter/regulator assembly. Available at most any auto parts store (NAPA# 3737), the Corvette fuel filter features an internal pressure regulator with an external fuel return connection as if it was made for the RX-7/LS1 conversion. The inlet and return lines connect with traditional push-on hose-and-clamp connections, while the outlet connection to the LS1 fuel rail requires GM's proprietary LS1 fuel line fitting. While the most simple and straight-forward installation locates this filter/regulator in the RX-7's engine compartment, a more sanitary and stealth installation location would be under the RX-7's fuel tank access panel near where the lines come out of the RX-7's fuel tank. Regardless of plumbing methods used, BE SURE TO ROUTE ALL FUEL LINES AND CONNECTIONS IN A SAFE AND SECURE MANNER AWAY FROM (OR SHIELDED FROM) ALL EXHAUST COMPONENTS.
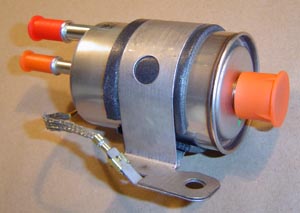
Identification of the Corvette FPR's inlet and outlets are as follows...
...Large single female outlet...(orange cap on right side of pic)...this is the FPR's pressure outlet that gets routed to the Camaro/Firebird LS1's fuel rail.
...Large 3/8" male barbed inlet...(red offset cap on upper left side of pic)...this is the FPR's supply inlet that gets plumbed to the pressure line from the RX-7's fuel pump.
...Small 5/16" male barbed outlet...(smaller orange cap on the left side of pic)...this is the FPR's excess fuel return line that gets plumbed to the RX-7's fuel tank return line.
 Connections to the Corvette FPR's barbed male tubes can be done with rubber fuel line and clamps or with compression fittings and AN adapters. Connection to the female pressure outlet port requires a special snap-in o-ring fitting that GM uses on many of it's newer vehicles. For a low buck solution, the fittings can be obtained at a wrecking yard, and connected w/ compression fittings to common tube or fuel hose available at the auto parts store. For a better looking and possibly more secure solution, compression fittings and AN adapters can allow use of stainless braided fuel line. The FPR pictured at right uses all three connecting options.
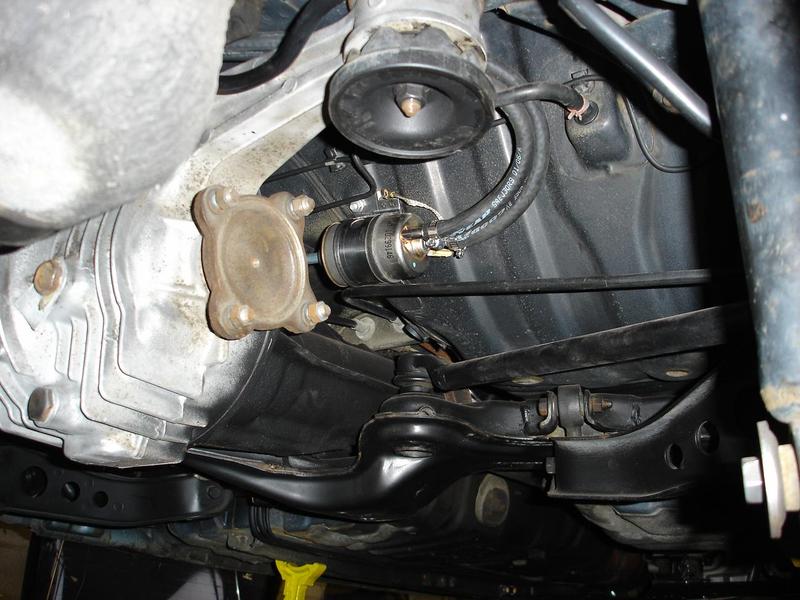
It's pretty easy to install one of these filter/regulators under the hood near the location of the RX-7's original fuel filter. Again, be warned, that in Calif, the Corvette regulator will not be legal as it was not part of the Camaro LS1's smog certified combination. A proper conversion there will require installing the LS1 fuel pump module inside the RX-7's fuel tank.
Here's a view of the Corvette fuel filter / regulator installed above the 2nd gen RX-7 differential. This is a great place to hide it if needed, and it will reduce overall weight a bit as the return line is much shorter than with an engine compartment installation.
Click on the pic at right for a larger view.
 While you are under here installing your FPR, it's a great time to perform a highly recommended upgrade, install a pinion snubber. Basically, the pinion snubber mounts in the top of the driveline tunnel, right between where the e-brake cables mount to the chassis, dead center above the nose of the differential (in the upper pic, it's the area between the brake cables, just below the corvette fuel filter). It's purpose is to take the load off of the stock RX-7 front diff mount, which can tear, resulting in pre-mature diff failure. With the addition of the pinion snubber, the stock '86-'88 RX-7 NA limited slip differential will be capable of dipping into the 10's at the strip with a manual transmission. With an automatic trans, the same rear will be capable of mid 9sec timeslips.
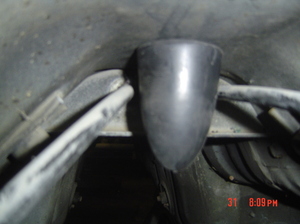
Here's a pic of a snubber properly installed. Although it's necessary to drop the rear subframe a bit for access and installation, it's well worth the trouble. There is actually a small round recessed "dimple" (about 3/8" dia) in the top of the tunnel's sheetmetal, under the rear hatches, marking the correct place to drill the required hole necessary for snubber mounting. It's almost as if Mazda knew we would be performing these upgrades.
Re-plumbing the RX-7's AC system is easier than one might think. We suggest that you re-use the OEM hose fittings/pipes from the RX-7 at the firewall, condensor, and drier. Re-use the OEM hose fittings for the compressor that you are using. Salvaging these fittings will not only save you money, but it will insure that you have the correct fittings for your application. The salvaged fittings will be fitted with new hose and crimp sleeves, and hose length and fitting angle can be adjusted to your exact requirements. The AC system plumbing should be routed as follows...
...large firewall fitting connects to the compressor suction port.
...small firewall fitting connects to the reciever/drier outlet port.
...compressor pressure port connects to top of the condensor core.
...condensor core bottom connects to the reciever/drier inlet port.
After the hose lengths and fitting direction are tailored to your application, return to the hose shop to have your new crimp sleeves crimped onto your new hoses permanantly.
After the hoses are attached, you can take your car to the AC shop to evacuate and charge the system.
If your completed AC system is operating under severe conditions, a small 10" fan can be attached to the condensor core to boost performance.
The electrical part of your engine conversion for the AC system is covered in the electrical section.
2....Considerations & Requirements....
4....Engine / Transmission Installation....
5....Exhaust / Throttle Cable / Accessory Drive / Pulleys....
6....Cooling / Fuel Systems....
7....RX-7 Wiring Harness Connector ID and Circuit Locations....
8....Electrical System Modifications By Circuit....
9....Start-up / Troubleshooting....