#50+retired onDalNet
How To..... DCC send a file
Optimized for Netscape in 640X480 resolution

DCC file send is one of the most commonly used functions in mIRC. DCC send can transfer sound files, pictures, scripts and even functional programs between users. Mastery of the DCC send function will open the door to literally hundreds (if not thousands) of accessories and add-ons for use with mIRC.
DCC sending and receiving is easy if the setup has been properly configured, so let's begin there:
Enabling mIRC to Detect and Respond to DCC Requests:
Fortunately, proper setup is easy: First click on the "Setup" icon  and then select the "Local Info" file tab.
 The "Local Info" Section:
For this first time setup, leave the "Local Host" and "IP Address" boxes empty. After you have finished setup and connected to a server, these boxes will contain information pertaining to your connection, but that information may change from time to time when you connect. Unless you know what you are doing and why, DO NOT attempt to enter this information manually.
Important:
In the section labelled "On connect, always get," be sure that both the "Local Host" and "IP Address" boxes are checked - one may be grayed out as here, but it should still have a check in it. THIS IS CRITICAL! If this is incorrectly set, you may be able to receive a file or answer a chat request by DCC, but you will not be able to send a file or request a chat yourself by DCC.
In the "Method" box, check "Normal" if you have an at-home type internet account that lets you dial in by telephone to connect. This determines just how mIRC asks for the critical information it needs to recognize other people via DCC. (I operate from a university network, so I have to use the server method.) If for some reason "Normal" doesn't make things work for you, then by all means try the "Server" method, but try "normal" first.
When these settings are correct, you have "enabled" mIRC to use DCC. Now click on "OK" to close this window. Next we will optimize the DCC settings themselves. To learn more about how DCC works before setting up your DCC Options, skip below to the "DCC Short Course."
Optimizing the DCC Settings:
1) Click the DCC options button  to open the "DCC Options window"
The DCC Options dialog consists of several parts (file tabs), but you will not need to make changes to all of them. For this first time setup, it's probably best to check the boxes in each of the DCC Options sections exactly as indicated here. In the sections that specify directories (folders) you can use your own directory names. If you wish to save received files in a different directory or directories than named in the illustrations, simply substitute those names at the time (see also the mIRC help section on DCC Receiving).
This page will guide you through a first time setup of DCC Options to maximize the efficiency of DCC and protect you from awkward situations, such as receiving the so-called "Script Virus." Each of the sections important for first time setup will be treated separately.
 The "Send" File Tab
The first section showing when you open the DCC Options dialog is the "Send" file tab (right). The "trick" here is to understand that "send" in this case means what happens when a DCC file is sent, i.e. the other guy is "sending" and this section determines what your mIRC will do in response to the other guy's "send" request.
Check the boxes exactly as indicated in the illustration. Make sure the "Auto-get file and" box is NOT checked. This your only opportunity to recognize and refuse dangerous or nuisance files, such as someone trying to "overwrite" your .ini files or send you "script.ini."
Make sure the "Show get dialog" button is selected, and when you have the dialog window configured as in the illustration, click on the "Chat" filetab.
 The "Chat" File Tab
The same thing is true here as for the DCC Send above - this setting determines how your mIRC will react to someone else's DCC request to you. Make sure that the "Auto-accept and" box is NOT checked. Turning on "autoaccept" could allow someone to "attack" you by repeatedly opening more and more chat windows with you until you pass so much traffic through the server that it disconnects you for "flooding.".
Be sure the "Show chat dialog" box IS checked. This will cause a notice to appear whenever someone tries to DCC chat with you, allowing you to see who it is and either refuse the chat if you do not know the person or accept the chat if you like. When the "Chat" dialog window looks exactly the one here, then click on the "Dirs" file tab to move to the next section.
 The "Options" File Tab
Don't be confused by what seems like a myriad of options, there are really only two that we need to deal with. DCC transfers are usually done in the background, that is they are started, then either minimized or covered by other windows. It takes a real "nerd" to abandon chat and watch a DCC transfer window. The two options we'll deal with here determine what happens to a DCC transfer or chat window when it is finished.
For this first time setup, it is probably best to have mIRC simply close DCC windows when they are completed, but when that happens you should know about it so you can keep track. In the "On DCC Completion" section, to the right of "notify with beep," check the boxes for "send" and "get." (It's ok to check the "chat" box also, but since new users rarely run more than one DCC chat at a time, they know that the chat has ended and don't need to be notified with a beep sound.)
In the same section, to the right of "close window," check all three boxes to have mIRC automatically close the windows of DCC connections when they are done. This will help keep your screen from getting cluttered with windows hiding one another. Later you can uncheck any of these if you like - for example to keep DCC chat windows to scroll back when the chat is done.
Don't worry for now about what all the other "options" do. When your "Options" file tab window looks like the one here, click on the "Dirs" file tab for the final section we need to set up.
 The "Dirs" File Tab
This section determines where on your hard drive mIRC places files that it receives by DCC. You can have sound files (.wav, .mid, .mp3, etc.) sent to their own directory which is different from images (.gif, .jpg, .bmp, etc.) and mIRC will sort them automatically as they are sent. However, you have to tell mIRC first what those directories are and what to send to them.
It is important to set this section up so that files are NOT automatically routed to your mIRC main directory (usually c:\mirc). Files sent there can either be a nuisance, like the so-called "script virus," or downright destructive (such as an empty .ini file maliciously sent to "overwrite" your existing one, causing you to lose functions in mIRC and/or a lot of effort in building those .ini files.)
In the box labelled "DCC get directories," the "default" selection is the one we want to work with. It names the directory to which mIRC will direct files whose extensions (.wav, .gif, .dll, etc.) it does not recognize. If "default" is not the selection showing, click the small button to the right of this box and select "default." Once "default" is showing in the selection box, click the "Edit" button and you should see the window below right.
 Setting the Correct Directory
This window allows you to specify what kinds of files to send where. In order to protect your hard drive, it is a good idea to set this "default" up for a directory other than the directory where your mIRC program files reside (usually c:\mirc). Click on the wide button marked "Into this Directory" and from the listing that appears, choose a directory into which you want DCC transfers other than sound and image files to go. When done, the name of the chosen directory should appear on the wide button instead of c:\mirc.
With this configuration, when mIRC finishes receiving a file with an extension it does not recognize, it will send that file to the directory specified here. Your mIRC operating files are safe, and no one can "plant" a malicious or destructive file in a place where you cannot control it. Note: If you receive any executable file via mIRC (.exe, .com, .bat), before executing it for the first time you should ALWAYS check it with virus detecting software (such as McAfee's VirusScan), that is using a current database.
When you have selected a directory other than c:\mirc (or whatever the name of your mirc program directory is), click the "OK" button to close the "editing" window, then click the "OK" button to close the "DCC Options" window and save your settings. You are now ready to safely and efficiently send and receive files or chat by DCC.
How to DCC Send a File
There are two ways to initiate a DCC send to someone else:
Note:
You must be logged onto a server to initiate or receive a DCC request. For the reason why, see the "DCC Short Course" below.
1) Starting a DCC when not checked into a channel:
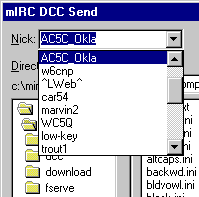
Click on the DCC "Send" icon  (Note: On older versions of mIRC, this button may be grayed out when not connected to a server) and in the selection window (see below) enter the nick you wish to send to (or click on the nick if it is already in the drop down list (see below right).
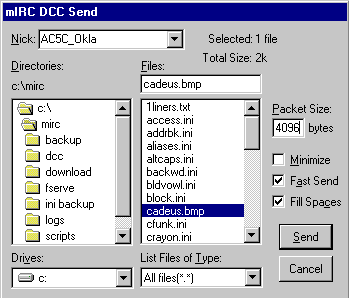
Then, in the file listing that appears navigate to the appropriate drive and directory and double click on the desired file name.
Note: You do not have to be checked into a channel to initiate (or receive) a DCC send, but you do have to be logged onto a server on the same network as the other user in order to start a DCC connection. However, once you have started a DCC connection, you can disconnect from the server, connect to a different server or the server you are on can "lag" or "split" repeatedly without disturbing the DCC transfer or chat. DCC transfers and chats operate independently of IRC servers once they are started; just remember that they do require a server to find the other person and get started.
2) Starting a DCC when already on a channel
When you are checked into a channel, and you wish to DCC send to someone else in the channel, highlight their nick in the list on the right side of the channel window, then RIGHT CLICK the name and select DCC/Send. In the file listing that appears (see above) navigate to the appropriate drive and directory and double click on the desired file name
Note: You do not have to remain checked into the channel in order to complete a DCC send. If you exit the channel (or even disconnect from the server) the DCC will continue to completion or cancellation.
How to DCC Receive a File
When another user initiates a DCC send to you, you will be notified by mIRC with a popup window such as this:
 This window will "interrupt" whatever you are doing, even if you are in another program altogether, and will not go away until it is either acknowledged or refused. If you wish to accept the DCC send, click on "Get" and mIRC will take care of the rest. If you click "cancel," the window will disappear for you, but the sender will see nothing until the DCC times out. If you click "ignore," mIRC will completely ignore the sender for about 20 seconds, giving you time to take measures against a flood attempt if necessary.
The file received will be placed in the directory indicated in the "Save As" box. If the default directory indicated in the "Save As" box is not satisfactory, you can change it before accepting the file.
Note: Unless you specify otherwise when receiving, DCC files will be written to the directory specified in the DCC setup dialog (see above). By default at installation, this is the main mIRC directory (where the mirc.exe or mirc32.exe file is). To view or use a received file, you must go to that directory. You can specify a different directory for DCC received files, or even specify multiple directories depending on the 3 letter file extension (see the mIRC help for details).
Pumping DCC Up
Normally mIRC sends a DCC transfer in short bursts, or "packets" of the size specified in the DCC setup dialog (see above) and waits for acknowledgement of the correct receipt of each packet before it sends another. This all takes time, of course.
It is possible to speed up DCC considerably if you increase the packet size to the maximum, and instruct mIRC not to wait for acknowledgement before sending the next packet. You can do this with the command:
/pdcc 9999999999
That's "/pdcc" followed by 10 number 9's and <enter>. This system works great except for really bad connections, or when you are badly lagged through your provider.
It works so well, in fact, that it's a good idea to make an alias to "automate" the PumpUp function. You can assign this task to a function-key as in the example below:
/sF9 /pdcc 9999999999
Simply paste the line above into your aliases.ini file, and when you hold down the <shift> key and press F9, you will see an acknowledgement that DCC has been pumped up to the maximum.
Even better is to put the /pdcc 9999999999 line in your "perform" section so that it executes automatically every time you log onto a server. Just click on the "general options" button, select the "perform" file tab and paste the line /pdcc 9999999999 into the text box and click "OK." The next time you log onto a server, mIRC will pump itself to the max, ready for your next DCC Send.
The DCC Short Course
(i.e., you can skip this if you like)
DCC stands for "Direct Client to Client" and is a connection as directly as possible between two computers on the internet. That means connecting your computer to someone elses with the fewest necessary computers between them. This is possible because every computer worldwide connected to the internet is assigned a unique number, called an IP Address, when it connects. That means that when you dial in to your provider and "log on," the computer on your desktop is assigned a number that no other computer in the world has - but that any other computer in the world can find.
It is critical to successful DCC connection that your mIRC be properly set up to identify itself to the rest of the IRC world, because most of us have connections to the internet that cause our IP Address to change each time we connect! Since a DCC connection is direct, that is, from one desktop computer to another, each computer must have a means of identifying and locating the IP Address of the other. Only then can the two computers connect directly. Each computer needs, as it were, a phone book listing the numbers of all the other computers it can reach at a given time. That is the function of the "server."
In a DCC connection (send, receive or chat), mIRC only uses the server to "look up" the "IP Address" of the other computer (identified to you in IRC by a "nick" instead of a number). Once the connection is made, mIRC no longer needs the server, in fact, you can even disconnect from the server if you like and the DCC connection will remain.
When you log onto an IRC network, your mIRC asks the server for the "IP Address" that your Internet Service Provider (ISP) assigned when you connected by phone. If your mIRC program is not properly set up, it will report no "IP Address" or an improper "IP Address" and the other user's response to your DCC request will go to a non-existent destination - that is, you will sit and sit, waiting for the other guy to "acknowledge" your DCC request, and even though he/she will insist that he/she has responded "OK," you will never see it on your end.
Once you are properly set up however, DCC is a snap. All you have to know is the nickname you want to send to or chat with and you're ready to go! Good luck, good DCC'ing...
See you on the channel,
Smitty (ac5c_okla)
_Bubba (wa5nfp)
| Home Page | General Info | The OPs | How To Info | F.A.Q. | Scripts | Channel Users |