|
Step 4, The
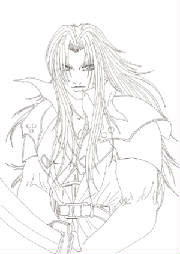
even more fun one!: The finished sketch:

|
| Step 4: The finished sketch |
The finished sketch. Actually,
I do not need al this detail for the CG that I'm going to make out of it, but I hate to be a lazy fuck. I also have fun making
these drawings and it is good practice. Besides that, it's just plain pretty to add shading and detail ^_^
Step
5, The bleg, I don't wanna do his crap >_< one!: Inking and scanning:
|
| Step 5: Inking and scanning (line art) |
After completing the final
drawing, I make an inked version of the sketch. It doesn't matter if the lines are wobbly or not that straight, this pencil
is used for scanning purposes only anyway and is what I use to colour it in on the computer. Corrections will be made
plenty.
If you want to be silly I
guess you can call this the cleaned up douga, but I'll just call it the Line Art.
Step
6, The necessary one!: Background

|
| Step 6: homemade welfare photoshop background |
The background is really
important for the appearance of your image. I chose to make a 'lifestream' looking one in Photoshop. Just experiment
a little with the different filters available. "Clouds", "Difference Clouds" and "Polar change" helped me in creating
this blurry image.
Step 7: The
determining one!: rough colouring

|
| Step 7: choosing your colours |
This is an important step.
Choosing the colours isn't easy. Of course, when creating fan art (like this) you already know the basic colours you need,
but when creating something original, colours are very important. Just play around with different colours and fill the large
area's. Don't be afraid to try out some outrageous colour combinations either, it's fun!
I'll let you in on a little
secret; I always let the background colours come back in the main image somewhere ^_~
Step 8: The
intensive one!: shading and detail

|
| Step 8: lots of work ahead |
After choosing your initial
colours and filling the large area's with it, it's time to start adding shadows (always use the same colour,
but darkened down a few steps), straightening the outlines, adding detail and making corrections. Working with layers is
the key. ^_^
Colouring is a time consuming
business. Everyone who ever scanned a self made drawing or altered an image on the computer knows about pixellation (the
"white dots"). I usually work a couple of evenings on colouring my drawings, dependable on the amount of detail.
Step 9: The
satisfactory one!: the finished image

|
| Step 9: the final result |
The finished product. The
bad part about working so long on an image is that I tend to loose interest after a while. Of course, I see the image progress,
and in this case it was fun because I love the character this much. As you can see I changed my mind with the BG
a little and altered it (compared to step 7).
Now go on and buy him!
lol
So that's it! ^_^
A quick overview on how I make these images.
I hope I did not bore you too much? ^_~
Thanks for visiting this page! If you have comments, feedback or questions, feel
free to send me a message.

Image thieves! Ye be warned!
Please do not take any of
the images on this site without my permission. If I find out you stole my images I will hunt you down and put a severe and
very nasty foot fungus curse on you and your next five generations. I mean it! DON'T STEAL!
|


