Shapes
 |
How the &@^# do
those Maxis dudes draw this stuff?!?
|
Before the above Maxis image gives you too much of an inferiority
complex (heck, I can't draw something like that from scratch either), let
me tell you the trick to draw anything you want in SCURK is just taking
it step by step. The buildings that we've been looking at so far in these
Tips pages have been mostly built up out of simple rectangular surfaces.
By simply using the <copy> and <paste> tools and the techniques that
I've covered in these pages, you can rapidly combine these rectangles into
boxes and then group these boxes together and make buildings. Complex shapes
are the same - you build up a shaped surface (pixel by pixel if you have
to) then combine various surfaces to make 3-D objects. Add the proper shading,
contrast, shadows and voila! you've tricked the eye into seeing the intricately
shaped building that you are imagining.
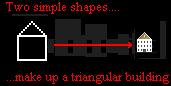 As you can see, even a simple triangle and a square can add
up to be a building. The square was easy enough to
make and for the triangle all you have to do is make diagonal sides (in
this case a 1x1 diagonal, but it could be anything) - despite the pixelation
the triangle-and-square looks just about the same as it would if you drew
it on a piece of paper. However, since I drew these
shapes flat (0 degree perspective),
the building that I made from it also has to be flat to the horizon and
the triangle winds up being a flat roof. A few shadows, windows, and a
chimney and I completed the illusion. But what if
I want to make this building at the standard 45 degree perspective? Now
the baseline of the structure is a 2x1 line and making the triangle becomes
a lot more complicated...
As you can see, even a simple triangle and a square can add
up to be a building. The square was easy enough to
make and for the triangle all you have to do is make diagonal sides (in
this case a 1x1 diagonal, but it could be anything) - despite the pixelation
the triangle-and-square looks just about the same as it would if you drew
it on a piece of paper. However, since I drew these
shapes flat (0 degree perspective),
the building that I made from it also has to be flat to the horizon and
the triangle winds up being a flat roof. A few shadows, windows, and a
chimney and I completed the illusion. But what if
I want to make this building at the standard 45 degree perspective? Now
the baseline of the structure is a 2x1 line and making the triangle becomes
a lot more complicated...
 My original wireframe structure turned into a "slice of cake"
because the new diagonal lines are longer then the original straight lines
- even though the new lines have the exact same number of pixels as the
old lines....yet another strange aspect of working in pixels.
As you can see, when you draw a shape in SCURK's isomorphic pixelated perspective,
you're going to have to start almost from scratch. You're going to have
to think about your building as a whole.
My original wireframe structure turned into a "slice of cake"
because the new diagonal lines are longer then the original straight lines
- even though the new lines have the exact same number of pixels as the
old lines....yet another strange aspect of working in pixels.
As you can see, when you draw a shape in SCURK's isomorphic pixelated perspective,
you're going to have to start almost from scratch. You're going to have
to think about your building as a whole.
Let's consider, again, the triangle-and-square. In the
first example, I turned this figure into a wedge-shaped building seen at
a 0-degree angle. If I want to turn this building into a "normal-perspective"
view, then I'm going to have to forget about my triangle-and-square and
consider it as a true wedge. When I look at this wedge from a 45-degree
angle, am I going to see one wall (like the 0-degree view) or two? That
depends on the exact angle of the wedge:
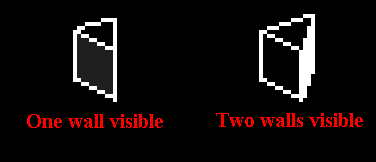 As you can see, the left-side wall is a "standard" 2x1 diagonal
wall and the rooftop lines are the critical element in defining the wedge.
(By the way, I made the left hand wall about 20% shorter from side to side
than it was when viewed head-on..20% seems to be a good rule for this foreshortening).
For the right-hand wall to remain hidden (one wall visible), then the rooftop
line for that wall must be straight up so that this wall is seen edge-on..
This means that the remaining rooftop line (on the left side) must angle
over gradually, at an angle somewhere between the 2x1 diagonal and straight
across (try it and you'll see that neither of those two lines works). By
trial-and-error, I settled on a 4x1 line. For two walls to show, then the
rooftop line for the right-hand wall is going to have to slope over a bit
to the right, but not all the way to a 2x1 line (a 2x1 line would make
a normal "square" building). Again, by trial-and-error, I settled on a
1x3 line (1 over, three up) which allowed me to draw a 3x1 line for the
other side of the rooftop, giving me a fairly symmetrical triangle. I then
carefully drew a 1x3 line for the bottom of the right hand wall and filled
in the outline, giving me a wall that is almost edge-on. If you
want to, using the same techniques, you can draw this wedge with the apex
of the triangle edge-on:
As you can see, the left-side wall is a "standard" 2x1 diagonal
wall and the rooftop lines are the critical element in defining the wedge.
(By the way, I made the left hand wall about 20% shorter from side to side
than it was when viewed head-on..20% seems to be a good rule for this foreshortening).
For the right-hand wall to remain hidden (one wall visible), then the rooftop
line for that wall must be straight up so that this wall is seen edge-on..
This means that the remaining rooftop line (on the left side) must angle
over gradually, at an angle somewhere between the 2x1 diagonal and straight
across (try it and you'll see that neither of those two lines works). By
trial-and-error, I settled on a 4x1 line. For two walls to show, then the
rooftop line for the right-hand wall is going to have to slope over a bit
to the right, but not all the way to a 2x1 line (a 2x1 line would make
a normal "square" building). Again, by trial-and-error, I settled on a
1x3 line (1 over, three up) which allowed me to draw a 3x1 line for the
other side of the rooftop, giving me a fairly symmetrical triangle. I then
carefully drew a 1x3 line for the bottom of the right hand wall and filled
in the outline, giving me a wall that is almost edge-on. If you
want to, using the same techniques, you can draw this wedge with the apex
of the triangle edge-on:
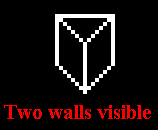 Again, this is really not difficult, jut draw two opposing
1x1 walls and a straight line across the top. The tricky part is making
sure that the building as drawn appears to be on flat ground, rather than
on a slope:
Again, this is really not difficult, jut draw two opposing
1x1 walls and a straight line across the top. The tricky part is making
sure that the building as drawn appears to be on flat ground, rather than
on a slope:
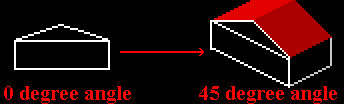
 To my eyes, the first wireframe building (the one at a 0-degree
angle), is the only one which doesn't appear to slope off at the wrong
angle, but it's up to you. All of these wireframes can be transformed into
full-fleshed SimCity buildings, it's just a question of using the appropriate
contrast and shadowing techniques to guide the viewer's eye to see these
buildings at the correct slope. For instance, you could put a nice dark
shadow across the ground to the left of the building so that the viewer
"knows" that the ground is flat, not sloping:
To my eyes, the first wireframe building (the one at a 0-degree
angle), is the only one which doesn't appear to slope off at the wrong
angle, but it's up to you. All of these wireframes can be transformed into
full-fleshed SimCity buildings, it's just a question of using the appropriate
contrast and shadowing techniques to guide the viewer's eye to see these
buildings at the correct slope. For instance, you could put a nice dark
shadow across the ground to the left of the building so that the viewer
"knows" that the ground is flat, not sloping:
 Add some texture
effects, put in a few ground-level details, add a few more buildings and
you have quite a nice tile - one that you started with a simple triangle
and a square! My point, which I will re-iterate throughout this page, is
that any shape can add up into a good-looking building if you put some
thought into it and use the proper technique.
Add some texture
effects, put in a few ground-level details, add a few more buildings and
you have quite a nice tile - one that you started with a simple triangle
and a square! My point, which I will re-iterate throughout this page, is
that any shape can add up into a good-looking building if you put some
thought into it and use the proper technique.
In the previous series of examples, we were using the
triangle-and-square to make a wedge..the triangle was parallel to the ground
and defined the shape of the building. Now let's look at what happens if
the triangle is perpendicular to the ground, defining the shape of the
roof:
 Once again, this is a rather simple building to draw in perspective,
it just requires a bit of thought as you do it. By now you know that when
you draw a shape at a 45-degree angle you have to make it a little shorter
(from side to side) than it would be if you viewed it head-on - about 20%
shorter. The peak of the roof triangle situated over the exact middle of
the rectangular wall, so for my perspective view, I had to count over to
the middle pixel of the wall (20 pixels over from the left) and draw a
vertical guideline:
Once again, this is a rather simple building to draw in perspective,
it just requires a bit of thought as you do it. By now you know that when
you draw a shape at a 45-degree angle you have to make it a little shorter
(from side to side) than it would be if you viewed it head-on - about 20%
shorter. The peak of the roof triangle situated over the exact middle of
the rectangular wall, so for my perspective view, I had to count over to
the middle pixel of the wall (20 pixels over from the left) and draw a
vertical guideline:
 Now that you have the guideline, you have to decide on the
angle of the roof by choosing the diagonal lines to use on the right and
left sides (no, they won't be the same). Fortunately, a straight line on
the left and a 1x1 diagonal makes for a rather nice roof, at a moderate
angle. In this particular case, due to the way that the pixels line up,
you actually can finish the roof in one of two ways, depending on where
you start the rooflines:
Now that you have the guideline, you have to decide on the
angle of the roof by choosing the diagonal lines to use on the right and
left sides (no, they won't be the same). Fortunately, a straight line on
the left and a 1x1 diagonal makes for a rather nice roof, at a moderate
angle. In this particular case, due to the way that the pixels line up,
you actually can finish the roof in one of two ways, depending on where
you start the rooflines:
 To make a finished building, all you have to do is erase
the guideline, draw 2x1 lines up from each of the corners of the shaded
wall and each of the corners of the roof (including the sunlit corner),
add some details and shadows and you're done:
To make a finished building, all you have to do is erase
the guideline, draw 2x1 lines up from each of the corners of the shaded
wall and each of the corners of the roof (including the sunlit corner),
add some details and shadows and you're done:
 |
More detail would be nice, but you get the
point ;-)
|
What about if you want the roof to slope at a different angle?
Then you are going to have to use different diagonals, and use your judgment
to see what "looks right":
<TO BE CONTINUED...>