|
Starting Hatchling Water Turtles
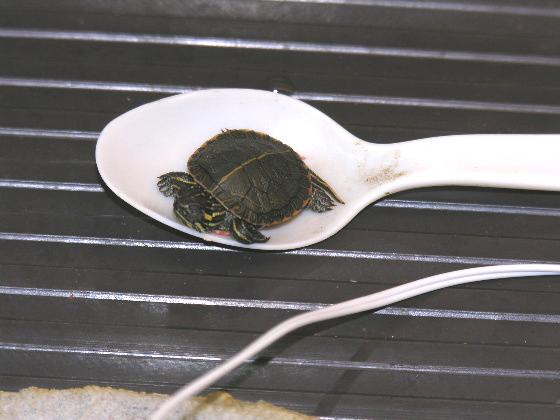
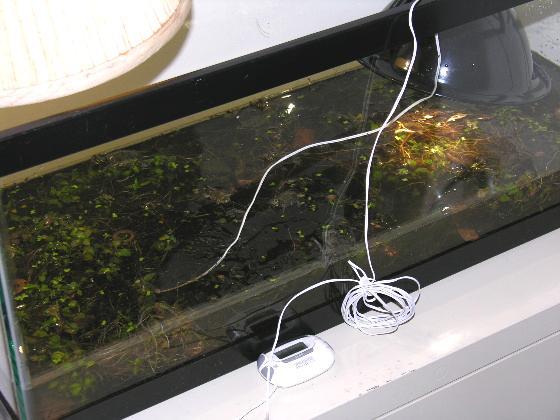
In Tour Two: Baby Water Turtles we describe how we care for small water turtles in an aquarium. It is not how we care for new hatchlings. It must be obvious because we received many questions asking how to care for very small hatchlings like painted turtles. Here is how we start them. Our set up has three components. The first is a kitty litter plastic pan. The second is a concrete rock we made - see Tour Twelve: Many Uses for Concrete. The third is plastic leaves to hide under. In the pan we place the rock, the plastic leaves, about 1" of water, and the baby turtles. Our concrete rock is flat on the bottom and is easy for any turtle to walk up. The trick is walk up not climb up. There are no hard to climb surfaces that could cause a turtle to fall off onto its back. The flat bottom minimizes food from being tapped underneath the rock. We have a 30 gallon breeder aquarium which is used by Emily in the winter. It is drained and cleaned when she moves outside for the summer. The empty aquarium is the perfect place for the pan and babies. The aquarium light provides light but little heat. No basking lamp or water heater is used. The babies are maintained at normal room temperature. The vinyl floor mat used in the aquarium is useful empty. When its time for the daily water change, the babies are placed on the mat inside the aquarium where they enjoy running around. It is very convenient and totally safe. We feed the babies in the pan since they need plenty of time to eat. We place the food in clean water each day. We start them on flake fish food and granular fish food that sinks. They start eating within a few days. Then we add Reptamin Floating Sticks and stop the flake food. We continue the granular fish food because we use Tetra ColorBits. ColorBits are high in pigments to enhance the color of fish. It has the same effect on turtles. The babies also like the ColorBits. | pic 5 | Occasionally we introduce large pellets and other treats the larger turtles are getting. We do not feed them live foods such as feeder fish. Live foods often carry parasites. In other tours we caution readers about the potential loss of baby water turtles. We expect some to die within the first year. That is still good considering the dangers they face in the wild. It is also a good reason not to rush out and spend a lot of money on an aquarium set up at first. This tour features Pincushion at one year old and Maundy and Thursday which are new hatchlings. All three are siblings and the offspring of Davenport and Sofa our western painted turtles. Pincushion is taking a step backwards in this setup, poor baby. All were found in spring after over wintering in their nests. We found the nest of Maundy and Thursday. It was at the highest traffic area in the pen and must have been stepped on dozens of times. The eggs were only 2" deep. In spring during the writing of this tour Davenport laid seven more eggs which were recovered and placed in the incubator. The nest site was about 6" from the nest of Maundy and Thursday. This is our basic set up for new hatchlings water turtles for their first few months. This is all we will do if they start eating. Pincushion did not even get this set up. Pincushion was a total surprise and was placed in a vivarium with two baby box turtles Dick and Cheney. Pincushion ate in the baby safe water bowl and enjoyed climbing among the plants. In the fall Pincushion moved into an aquarium with W our young spotted turtle and a two year old painted turtle. The pan, rock, and leaves get slimy from the food and the plastic holds a smell. We disinfect everything every week or two with some chlorine bleach in water. We also place the items out in the sun to dry thoroughly. Is that it? No! We have to spoil our babies too. As soon as our babies are eating regularly and growing they spend time in the aquarium where Pincushion spent the winter. It is a real playground for them. They are still moved to the pan to eat. The center piece of our aquarium is a floating island planter filled with plants. Baby tears cascade down into the water which the baby turtles use to climb aboard and hide in. See more pictures and how we built the floating island in Tour 19: A Floating Island Planter. We came across a chrome plated dish in a thrift store and thought it would work in place of a concrete rock for our babies. It has a textured pattern on the bottom which is good because we are using it upside down. We did not need it, but we wanted to show you a good substitute for the concrete rock. | pic 9 | By the way all seven of the eggs mentioned above hatched. Then three eastern painted turtles hatched. Then four more eastern painted turtles hatched. The pan was full but working well. It sure was easier working inside the aquarium where no babies could get lost. We also added a piece of vinyl floor runner in the pan for traction like we use in our aquariums. | pic 10 | We hear from people wanting to know when their babies will start eating. Baby turtles can go a very long time without eating, but it does worry us too when our babies don't eat. Cool temperatures is one of the reasons. We finally broke down and added a heat lamp partially so we can show you how to do it safely. Lets take a look. It is important to allow the babies to move out from under the heat lamp if they find it is too warm. Therefore, we only cover a portion of the pan with the heat lamp. We use a low wattage bulb and we monitor the temperature of the water with an electronic indoor/outdoor thermometer. And we only turn the heat lamp on when we are home to monitor the temperature so it does not warm them much over 80 degrees. Many of the babies do enjoy basking under it. We did not mention before that we spoon train our babies. We use a small plastic spoon to lift them out of the pan and onto a paper towel. They seem to accept this more than being handled and sit on the spoon long enough to be lifted out. So what else can we do if our babies do not eat soon enough to satisfy us. There are two things we can try. One is to add appetite stimulant drops to their water. Reptile and amphibian appetite stimulant is sold in many pet stores and is mostly vitamin A. For troubled turtles we will put them in a small container with just enough water to cover them and add a squirt of stimulant and food. Does it work? Sometimes there is nothing else we can try. The second thing we can do is provide natural foods. We go to a local pond and draw a bucket of pond water and stuff it with pondweed. This provides plenty of small critters and bugs as well as the pondweed. We dump the water and pondweed into an aquarium so as to have a mass of pondweed in two or three inches of water. The idea is to provide lots of natural moving things to eat. Moving critters stimulate turtles. We also add some pennies so as not to grow algae. We do not add turtle or fish food to this water because it will foul the water. This is very close to the natural environment these babies would live in.
Babies That Won't Eat It is very troubling when baby water turtles will not eat anything. Eventually they die but it takes many months before they die. They are just too small to do anything with; frustration turns to despair. What can we do? In the year 2006 we were blessed with many babies including four Gulf Coast box turtles which were placed in a vivarium (see Tour One: Baby Land Turtles) and seven western painted turtles. One of the painted turtles was a runt with no eyes and other problems who eventually died. The other six and the box turtles would not eat. The six painted turtles went from the startup pan to the tank with pondweed and bugs shown above. No eating was observed. As the weather turned cooler they were moved to a heated aquarium with some of their older siblings to guide them. Still they would not eat. Without eating they were using up energy swimming they could not afford to loose. So we finally moved them to the vivarium with the box turtles. In the vivarium the painted turtles dug in with the box turtles. Food was placed in the water bowl each day. All ten were given weekly soaks in a tub of water. Tiny earthworms were provided in the soaking tub when they could be found. By Christmas this routine was beginning to work. Some of the earthworms were being eaten and some of the painted turtles were using the water bowl more and eating some turtle food. Finally some progress. Our thinking was to allow these babies to bury themselves similar to having never left their nests. Researchers have proven that many baby turtles can freeze in their nests and survive emerging in spring. While the vivarium is at room temperature, the babies can rest until they are ready for activity. The vivarium is kept very moist with plenty of moss and plants so the babies do not dry out. Placing food in the baby turtle safe concrete water bowl fouls the water and the bowl develops an odor. This is easily overcome when cleaning the bowl. We scrub the bowl with a stiff brush and water. Then we fill the bowl with water in the sink and add about a teaspoon of chlorine bleach. In about a minute the smell is gone. Then we simply rinse well and return it to the vivarium. We also do this occasionally with just box turtles to disinfect it.
If you have a similar problem and you decide to set up a vivarium for starting
baby water turtles, you may wish to use the largest water bowl that will
fit in the vivarium. But remember you need to remove it and clean it daily.
We can lift out a 6" bowl past our aquarium light without removing the
light. Make the vivarium pleasing to you because it may remain in use for
some time. Definitely add plants as your guide to keeping the substrate
moist. Potting soil with fertilizer is okay or use any substrate that will
support plants.
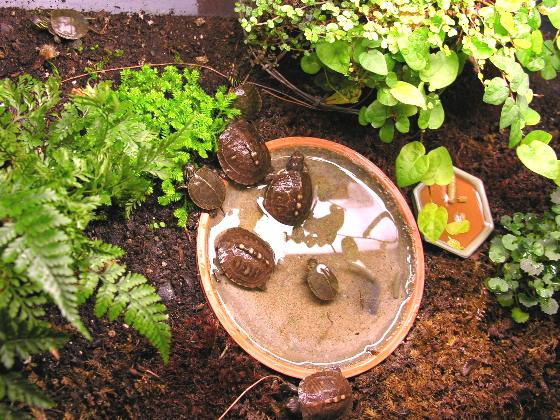
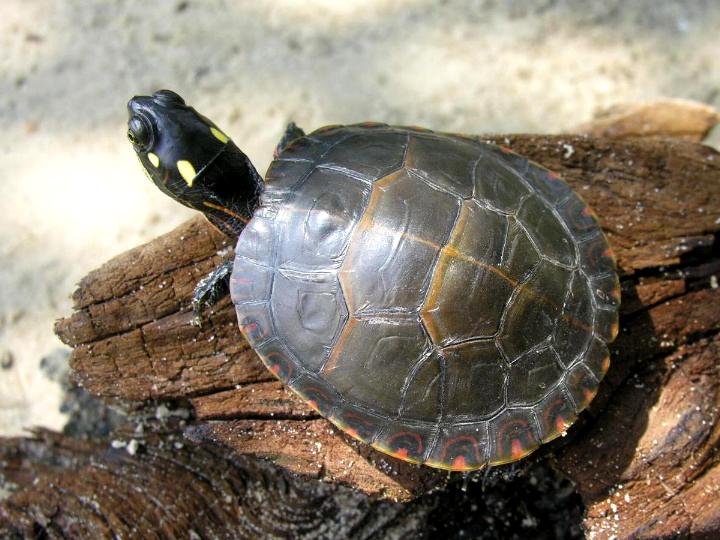
Baby Turtles in our Bog-in-a-Box In 2007 we built our bog-in-a-box turtle pen which is featured in Tour Five on the Backyard Turtles page. It was another experiment that has been very successful. Our intention was to create a bog habitat which became more like a shallow edge of a pond. It is for placing young water turtles outside like we do with young box turtles in our Summer Box for Juvenile Box Turtles Outdoors. It has proven to be an excellent way to start baby water turtles without all the daily care. It was seeded with water from vernal ponds and pondweed so it has natural critters like small bugs and snails as well as the pondweed. Pondweed is consumed by larger water turtles. We simply place the baby water turtles in the bog-in-a-box after their yoke sacks are completely absorbed. This method does not domesticate them since they basically live as wild turtles who hide when someone approaches. Often the only way to catch them is to leave the lids open on a sunny day and watch for movement. As they grow they are easier to see. Some food sticks are placed in the water a few times a week. Since this is not filtered water, we go easy on food sticks so as not to foul the water. It is hard to say if the turtles eat much of the food. After they are definitely growing, most of them are put up for adoption. Here are a few pictures of some babies started in the bog-in-a-box. | pic 21 | pic 22 | pic 23 | pic 24 | pic 25 | pic 26 | pic 27 | pic 28 |
We hope you enjoyed our eighteenth behind-the-scenes tour.
|
