
WHAT YOU WILL NEED
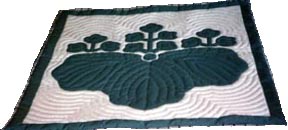
Your quilt top
is now finished. Most quilters pull out basting threads as they applique but if any remain, this is the time to remove them. Isn't it beautiful and aren't you proud of yourself? You should be. Now you are ready to assemble your quilt.
Batting can be bought by the yard in fabric stores but it is far easier to buy seamless sheets in the size you need. They are available in everything from Crib (45"x 60") to King (120"x 120") size at Variety stores, some fabric shops and of course from quilting supply stores and catalogs. There are some excellent on-line resources for telephone orders, eg. Hancocks or Keepsake Quilting; see LINKS page. Most quilters use polyester batting but pure cotton and poly/cotton blends are also available.
Batting thickness is largely a matter of personal preference. The thinner the batting, the easier to quilt and the smaller your stitches will be. A very thick batting can result in a quilt which is too heavy to use as a bedspread, particularly in a warm climate. It will however, make a quilt which is "puffier" and more sculptured in appearance. There are definate differences between brands of batting and you may want to check out several different ones. Hobbs Polydown is a good, all-purpose choice used by many quilters.
Backing: Remember that third large square of fabric you set aside months ago. Now is the time for it to come out of hiding to become the back of your quilt. If you didn't do it before, press it exactly as you did the other squares; lengthwise into halves, then into quarters, then eighths.
ASSEMBLY
For this step, you will again need the large flat surface -- several tables or the floor -- which you used to lay out your quilt face prior to appliqueing. Just as you did then, spread the fabric for the back of your quilt flat and fasten at the edges.
Over this spread your sheet of batting making sure it lies smoothly, covering the entire back of quilt.
Finally, (at last), spread your quilt top over the other two layers matching folds in face and back. Be very sure that the fabric grain in both pieces runs in the same direction. If it doesn't, quilting will be almost impossible since the "give" in fabric differs with grain direction.
Check around edges of layout to make sure the fabric layers match at center folds and corners. Some adjusting and smoothing will almost certainly be necessary. Batting will probably protrude beyond edges. It should, you can trim it later. Using long quilters' pins, fasten edges loosely together.
Starting in the center, pin all layers together,
first along fold lines including diagonals, then securing layers with more pins about 12-14 inches apart throughout the quilt. There is no need to measure, just be sure all layers are firmly pinned. Finally, unfasten from surface, pin edges neatly and trim off surplus batting a few inches beyond edge of quilt.
Your quilt is now ready to be moved to a table for basting.
BASTING
You now have an assembled quilt, pinned together and draped over a table. Start at the the center,
(tired of that - OK - the "PIKO") with a long basting needle and regular sewing thread, preferably white. Taking large stitches, 11/2-2 inches, baste along the fold line through all
layers, to one of the outside edges. Take 2-3 loose stitches to end thread. Return to the center and repeat, basting to opposite edge.
Now, move out 10-12 inches from center line which you have basted. Starting at center fold,(not quilt center), again baste out to both edges, parallel to previous basting. Measuring and placing pins to insure a straight line may be helpful but is not essential.
Continue this process on both sides of quilt, working in opposite directions from center fold.
Smooth out any surplus fabric on either face or back, as you go. When you reach the edges,
parallell to your basting lines, place your last row of basting approximately where you want your finished quilt edge to be. Ideally, this line should be an equal distance from all outside edges of your pattern. In reality this may not be quite so, try for fairly equal.
At this point your quilt is basted in one direction. Turn it around and do exactly the same thing going in the opposite direction.
The finished result will be a grid of neatly basted squares which will hold all parts of your quilt together as you work.
Trim all outside edges 3-4 inches beyond edge of basting. Part of this surplus will eventually go inside your quilt binding. The rest allows for adjustments and can be trimmed off later.
TRANSITIONS
This is another step which has gone rather quickly. If you belong to a quilt club and were lucky enough to have had help from other quilters, it probably took only a few hours; if you are working alone, a day or two.
At this point, many experienced quilters choose to start a second quilt. The reason is simple, while quilting on one they are appliqueing on the second. This introduces an element of variety into the work and eliminates any possible boredom which may result from looking at the same quilt every day for months on end. Of course anyone who decides to do this is clearly hooked on Hawaiian quilting.
Believe it or not your quilt is now more than half finished. From here on you will be working with the fully assembled quilt as you master the fine art of quilting. Did you spread it out on a bed yet to admire? If you didn't, by all means do before you continue.