
QUILTING STITCHES
The quilting stitch is basically a small running stitch, ideally the smaller the better, through all layers of fabric. Rather than take one stitch at a time, quilters usually "rock" the needle up and down through the fabric, picking up 3-5 stitches, then pulling the needle through. If you have trouble with this don't worry. The more you quilt the easier it will become. Take 10-15 stitches before drawing thread tight. The size of stitches is important. It is much more important that the stitches be even, ie.of equal size. They will get smaller with practice.
STARTING AND ENDING THREADS
Probably the most popular way to start a thread is by making a small knot in the end, pulling the knot through the fabric from the quilt face so that it is buried in the batting, taking a single backstitch, and going on from there. Threads are ended by taking 1-2 backstitches, running the needle through the batting for about an inch and cutting off at the quilt face.
Another approach which has some advantages is to just start quilting with your new thread, leaving at least a 3-4 inch end dangling. This can later be finished off with a couple of backstitches just as when ending the thread. One advantage of this method is the total absence of knots in your quilts. Another is that it is possible to start in the middle of a long thread and quilt in both directions from your starting point, backstitching at both ends.
ECHO QUILTING
Outline or "Echo" quilting, as it is called, is unique in the sense that it follows precisely the outlines of the quilt design elements, rather than superimposing a different pattern. To try it out, draw yourself an empty circle and decide how far apart you wish to space your lines of quilting. The outside of this circle is both the edge of your design and the place for your first row of quilting. This row is called "Quilting in the Ditch". Now add smaller concentric circles inside it. The center circle should be no smaller than your chosen spacing. See, it's done.
Next draw 2 other nearby circles. Then draw one line around the outside of each at the desired spacing. Is there still empty space in between? If so draw another line around each. Continue this until the space is filled. Always start by measuring your spacing from the edges of the circles, and always maintain the same number of rows out from each circle. This is absolutely essential. Otherwise you will get a spiral quilting line, which is not what you want.
As you move outward and your number of lines increases you will finally reach a point where one of several things will happen:
1.The lines will merge into a single line. That's OK so long as it is the same number of rows out from each circle. Where the space widens out again you will start a new row of quilting following the previous lines in both directions.
Now hold up your drawing and look at it. That is Echo quilting. You will be following exactly the same procedure within and between the parts of your design as you quilt.
VARIATIONS ON A THEME
The background on Hawaiian quilts today is almost always quilted in Echo quilting. Some older quilts were done differently but this is now rare. Many quilters however, do vary their quilting method within the pattern elements.
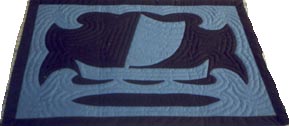
For example, both Pineapples and Breadfruit are often quilted in a crosshatch pattern. Many quilters prefer to quilt the leaves in a pattern with veins similar to those found in an actual leaf. A turtle may be quilted to show the markings of its shell.
These variations are completely acceptable and may in fact add to the interest and beauty of the finished quilt. Experiment a bit. If you choose to do something like this, be careful and be consistent throughout the quilt. The markings for such quilt designs are drawn onto the fabric in the same way as the lines for Echo quilting.
MARKING YOUR QUILT
Lay your quilt out on some flat surface, a table or a cutting board placed on a bed work well. Now with your chosen marking instruments, start in the center of the quilt and proceed just as you did with the practice circles. If you make a mistake -- everyone does occasionally -- no harm done, just erase and re-mark.
When marking aroung the outside of points, round them off slightly to give the finished quilting a smoother, more flowing effect. On the inside of points and in valleys, follow the outline of your design. Plan to completely mark an area slightly larger then the size of your quilting hoop. It's always nice to know where the quilting rows are going next.
PUTTING ON YOUR HOOPS
Slide the smaller hoop under your quilt and smooth quilt out over it. Place larger adjustable hoop on top of quilt and press down so that quilt is held firmly between the hoops.
Now, before tightning upper hoop completely turn the whole thing over and look at the back. The back of your quilt inside the hoop must be as smooth as the front. If it isn't you will get "bubbles" in your quilting which will only get worse as you work out to the edges.
Getting it smooth is very easy. Just pull gently on the backing fabric until it lies flat, then finish tightning upper hoop. If it is very badly wrinkled you may have to remove your hoops and start over but normally only the backing fabric is wrinkled, not the batting. NOTE: Doing this will not disturb your basting lines.
READY, SET, GO
Now, your hoops are on correctly, you have a good supply of quilting needles, thread, and beeswax, and have found a comfortable place to sit where you can spread your quilt out around you. Take a deep breath, and relax. Did you think this day would never arrive. It has. You are about to start quilting.
2. The lines will become either closer together or just a bit further apart than your chosen spacing. That's OK too. Just leave them alone and start new rows, one on each side, where the space widens out enough to do so.
3. You will be left with odd shaped open spaces between your outside lines. Still OK. What you do with these is fill them in with rows of quilting just as you did the center of your original circle or as in (1 and 2) above. It's always fun to see what shape they finally
end up.