Shadow
Way up in the SimSky, shining down on your SimCity, there
is a SimSun. Just because Maxis doesn't show it to you, doesn't mean its
not there. Every object in SimCity has a sunlit and a shaded side. Every
object in SimCity casts a distinct shadow. This shadowing is a crucial
element in making your tiles look realistic. Shadows create the illusion
of depth more than any other technique. Even a single pixel becomes a three-dimensional
object if it has a shadow...most of the chimneys on the simroofs are only
one pixel!
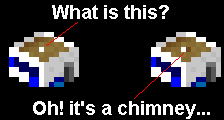 Where is the SimSun? What is the proper way to make shadows?
As always you can learn a lot by looking at other tiles. You'll notice
that all the buildings are sunlit on the same side - on the left. All the
shadows point the same way - out to the right - and are about the same
length as the height of the object which casts the shadow. By simple
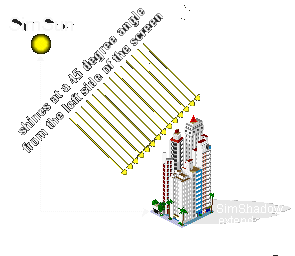
BoyScout-type deduction, you can conclude that the SimSun is off to the
left-hand side of the screen and is about half-way up the sky, at a 45
degree angle to the horizon, as it would be at mid-morning or mid-afternoon:
 This makes the basics of drawing realistic shadows pretty
easy. The left side of a building is always sunlit, the right is
always shaded. How much contrast do you need? Use the Rule of Three! (and
take another look at my page on shade).
Where do you start drawing the shadows? Start out on the ground, at the
closest corner of your object (the corner that is furthest down on the
screen). The shadow will go out ot the right from there. How far right?
about the same as the height of your object. How dark should it be (compared
to the ground shade)? use the Rule of Three! It's easy:
 The walls of this building are six pixels high, the ground
is a light tan color, so I simply put six pixels of a +3 contrast tan color
to the right of each pixel on the right hand side of the building's wall
(starting from where the wall meets the ground, of course). Even
in this simple model, there are some subtle details to watch out for. To
begin with, notice that the left side of the door is also shaded (by the
inside wall of the doorway) - this small bit of detail goes a long way
towards making the door look realistic:
 This "internal" shadow also works well for windows.
Notice that the retaining wall on the roof also has a shadow
(one pixel wide because that wall is only one pixel high). Most
important, note that the main shadow on the ground begins on the pixel
immediately to the right of the closest corner of the building,
not the pixel beneath it (a common mistake):
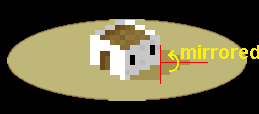
 As I wrote above, the shadow was drawn by simply going six
pixels to the right of where the wall meets the ground. But this only works
up to the far corner of the building, then the shadow has to angle back,
just like the hidden back wall of the building does. For a simple square
building like this one, drawing the shadow of the back wall just means
mirroring the lower portion of the shadow to the top:
 For a more complicated building, you are just going to have
to guess. But don't worry, you can't go too far wrong. Remember that in
SimCity, just like in a real city, very rarely will an object have a nice
smooth stretch of ground to cast it's shadow upon. Usually the shadow will
fall on other buildings or on a street with all kinds of textures and small
objects on it; it will get mixed in with other shadows; and, most common
of all, it will get chopped off by the edge of the tile that you are drawing.
In the end, what's important is that you give the effect of a realistic
shadow, not a scientific demonstration in optics! So, with realistic effects
in mind, lets look at how to draw shadows in "real-Simworld" situations.
To begin with, I don't like the way that the "corner of the shadow" looks
- it's too sharp. This is better:
 Now let's draw this "blockhouse" on a 1x1 tile, adding a
yard, a wall around that yard, and a tree. You can see that the simple
shadow changes a lot!:

Although I only added three new elements (yard, tree,
and wall), there is a lot going on now. The wall by the house hides part
of the original shadow, so does the tree. The trees shadow overlays the
original shadow and the texture of the yard breaks up the edges of the
shadow. The wall around the yard cast it's own shadow (which is clipped
by the edge of the tile), and is also shadowed by the tree. Lastly, the
tree has a shadow cast across it by the house and has shadows within it
from the various branches. None of this is really hard to do, all you have
to do is think a little bit about where the shadows are going to fall:
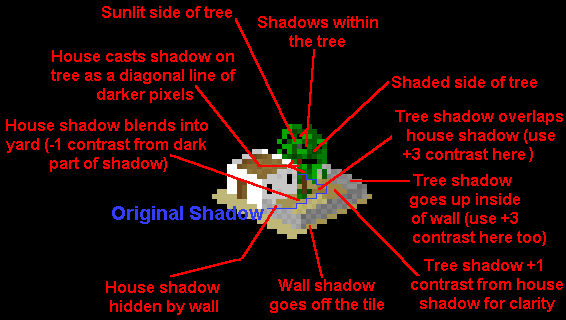
Pay close attention to how shadows overlap and how they
are cast onto vertical surfaces. Where they overlap, I use a shade that
with a +3 contrast from the underlying shadow (in the example above, where
the house shadow and the tree shadow meet, I use a +3 contrast from the
house shadow. The remaining part of the tree
shadow on the ground really should be the same shade as the house shadow,
but I make it +1 contrast for clarity. Where it goes up the wall I use
+3 contrast in relation to the unshaded part of the inside of the wall,
but I make sure to have enough contrast to clearly distinguish this part
of wall from the shaded outside portion of the wall. Sometimes you have
to cheat a bit on the shades in order to have clear contrasts - notice
that although the wall has alternating lighter and darker pixels, I made
sure to have the lightest of the inside wall pixels up against the darkest
of the outside wall pixels:
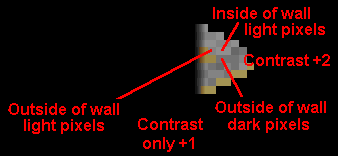
"Fudging" the shades like this, for contrast and clarity,
is probably the hardest part of drawing complex, inter-related shadows.
Shadows falling on vertical walls also require care. In the sample tile
we've been looking at, there are two shadows like this: the house shadow
on the tree and the tree shadow on the wall. In the case of the wall, where
the shadow hits the wall at almost a 90 degree angle, all you have to do
is draw the shadow vertically up the wall , starting where the shadow on
the ground meets the bottom of the wall. Here is an "idealized" drawing
that shows how this type of shadow (wall perpendicular to shadow) works:

As you can see, I simply drew the shadow "up" the wall.
If the wall is parallel to the shadow, things work a little bit differently:
 Since the rays of the SimSun come down at a 45-degree angle,
any shadow that is cast across a parallel wall will also be at a
45-degree angle (a 1x1 diagonal). Look closely at the shadow that the house
casts on the tree in my original example, and you will see that it is also
a 1x1 diagonal. Of course, the tree is round not flat like a wall, but
thanks to the amount of texture
involved, we can get away with this fudging.
Lastly, let's look at some real SimCity tiles to see how
all these techniques fit together. Here's Lee Sojot's OUB Center tile,
look at how he uses diagonals to show shadows being cast across the different
buildings:
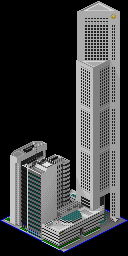 Below are some of my own tiles. In the tile on the left,
, the pyramid-topped building casts a shadow across one building and up
another. In the middle tile, look at how the palm trees cast a shadow on
the building behind it. In the last tile, look at how the jumble of buildings
cast different shadows across each other, and also how the overhang in
the tower of the blue building in the middle is defined by the shadow underneath
it.
Shadows may look complex to draw, but they are actually
just the application of a few simple techniques. With practice, you will
be able to nail them and you will find that they are well worth the care
that you put into drawing them. After all, everything that we see in the
real world is made up of nothing more than light and shadow.
 |
A ray of light ;-) Thanks, Slugg
for this neat use of light and shadow! |


