|
Body:
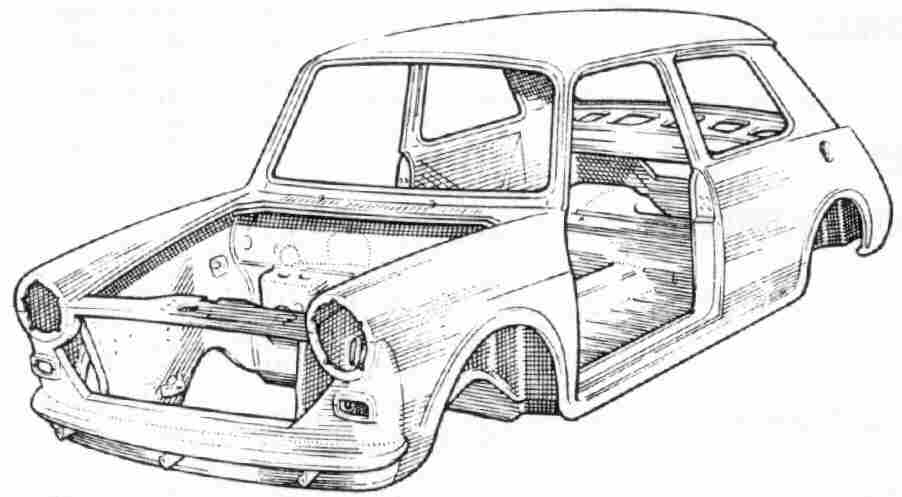
The two biggest enemies of the Austin America body: Water, which causes a tremendous amount of rust, and Mini owners who take
the engines and haul the "shell" to the wrecker.
Rust Proofing:
The absolute last word in rust repair and rust proofing, in my opinion:
-For floors with some minor holes or "lines" of rust through, use POR-15's floor repair kit.
I've seen samples of it from a vendor and it does an incredible job of patching, strengthening, and rust proofing for good.
www.por15.com
-For permanent rust proofing, in the convenience of an aerosol can, ZeroRust is the only product
to use. So good, in fact, that the state of Oregon is now using it to paint all of their metal highway bridges and the
state of California's Department of Transportation (CalTrans) now paints all their dump boxes with it. www.zerorust.com You can order it online at: www.restorick.com Or, use the info on the ZeroRust website to contact the folks at Zerorust and ask them who the closest
distributor is to you. I was able to locate a distributor 30mi south of me.
This is an extremely important job, especially if your car has some rust, or will be parked or driven in inclemant weather.
- Make sure all your leaks are fixed.
- Make sure all the body drains are open and working,
especially the ones that drain water entering the fresh air grills in front of the windshield.
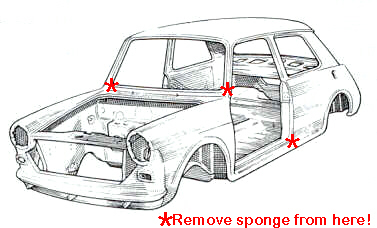
- Make sure you remove the large pieces of sponge that are packed in 4 places on the car body. Both of the lower corners
of the windshield pillars (the 'A' pillars) have big chunks of sponge stuffed into them. These cause the bottoms of the 'A'
pillars to rot from the inside near the tops of the front fenders. Access to them is from the inside after removing the top
dash pad. The rocker panels just at the rear corners of the doors also have big chunks of sponge stuffed inside. These cause
huge rust spots in the rockers just below the doors. Access to them is by removing the rear seat and then the interior rear
quarter panels.
- Coat the floor and anywhere else you can get to, with a product called POR-15. Incredible stuff
and it's paintable!
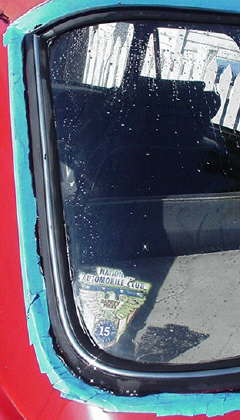
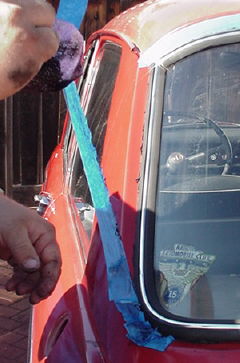
| Rust damage at lower left "A" pillar. |
|
|
| Factory installed foam gets wet from bad windshield seal. |
Leak Proofing:
These cars can leak! Once water gets inside, the carpet padding holds water against the seems
of the floor panels and the rust process begins. Leaks usually come from 3 places: Glass and door seals, heater unit, and
interior door panels.
-Make sure the rubber seals that hold the windshield and back glass in place are soft and pliable.
If the rubber is hard and dry, it will leak. If you can't locate the original seals, any automotive glass shop can install
generic ones that look identical. Have them glued in place. Water from the windshield wets the front carpets and firewall
area.
-Make sure the rubber that seals the outside of the door glass is soft and pliable. If the rubber is hard and
dry, not only will it allow a lot of water into the door, but it will scratch the door glass severely.
-The outer
rubber door glass seal is the same as the one used for Triumph Spitfire. The Spitfire one is a little longer, but is easy
to cut. This can be installed without taking the door apart. Simply pop loose the stainless steel trim piece that goes around
the entire top of the door surrounding the door glass. You don't need to take it completely off, just pop the lowest 6" or
so of it loose where it ends and meets the door skin. Now lift up the horizontal stainless trim piece that the rubber
is mounted to, starting at the rear of the door and working forward toward the wing window. Installation is a reversal.
Be carefull not to nick the paint!!
-The fuzzy felt and cloth piece that the inside face of the door glass seals against
is the same as that used on a Triumph TR-6. This is the piece that runs horizontally across the top of the door
body. It is also easily replaced wihtout taking the door apart. Simply lift up the stainless trim piece and remove
the old material. Cut to length and install the new material. Snap the completed assembly back in place.
-Both
of these parts are available through Moss Motors, among others.
| Door rain shields in place |
|
|
| 6mil plastic sheet sealed with strip caulk |
- Make sure the shields that cover the openings on the interior door panels are doing their job. Originally, these were just
big pieces of duct tape. The tape dries out, water runs down the door glass and out the opening onto the back of the interior
door upholstery panels. If your panels are warped, yours are leaking. Replace them with thick plastic sheets cut from building
material supplies plastic available at lumber yards and hardware store. Stick the plastic in place using a soft butyl based
material that comes in a "rope" shape from a glass shop. I've heard it called "dumb-dumb" and it looks
like black chewing gum. Great shuff and it will never leak. Leaks from the door interior panels will run to the front and
rear carpets by dripping off the bottom edge of the door panel.
- Make sure your heater isn't leaking. Poor water
into the fresh air grill in front of the windshield and then go inside and watch if it runs out of the heater box. If it
does, first try cleaning the drains of the fresh air well. If this doesn't work, and likely it won't, you'll have to remove
the heater box assembly to gain access to the fresh air well. Not a fun job, but you'll be glad you did. Leaks at the heater
will also wet the front carpets and firewall.
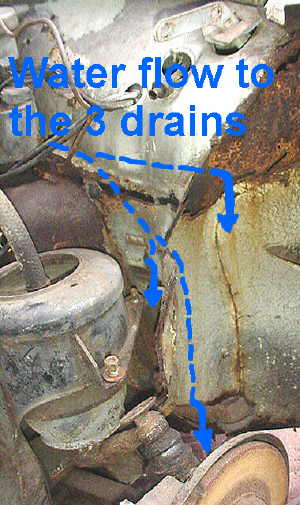
Leaks From The Heater & Upper Dash Area:
| 3 drains on each side of the car |
|
|
| Water travel indicated by dashed lines |
| Cutaway view of the fresh air well |
|
|
| Unpainted metal and uncaulked body seams |
-The Fresh Air Intake Well is probably the most likely source for your
water leak, if your front carpets and floors are getting wet. Or, you have rust and rusted out front floors and front
inner fenders near the firewall.
-As you can see in this photo of a cut-away of the fresh air intake well, it is an extremely
poor design.
- There is not caulking to protect any of the weld seams.
- There is no paint or primer on any of the metal.
- There is no way to clean leaves and other debris out of the crevises.
- There is no way to clean or really clear the drains along the inner fenders.
-Here are some suggestions for cleaning out this area:
- Remove the lower dash, steering column with the wheel and the heater box assembly.
You will likely find that the heater box assembly is totally full of debris, ie, leaves, dirt, crud, you name it. I
know this is the last job you ever wanted to do to the car. But, if you don't take the heater out, you'll just
be blowing most of the debris into the fins of the heater core. This will block the airflow and you'll have a heater
that basically doesn't work, not to mention no airflow into the car on hot days (as if that even helps with the black interior!).
- Use high pressure compressed air and a blow gun with a long nozzle, and blow
through the vent openings located just in front of the windshield.
- While using the compressed air, stick the nozzle of a shop vac into the opening where
the hood hinges go into the cowling.
- Use the blow gun to stir up all the debris and try to steer it toward the shop vac nozzle.
- Move the blow gun all over the place and blow in every opening you can find.
- Put the shop vac nozzle in and over every opening you can find.
- You can do a pretty good job of getting alot of the crud out of the fresh air well
and the drains this way.
- When you are saticfied that you've gotten all the debris, it's time to test for leaks.
- Put some tape over the 3 lowest screw holes that held the heater box to
the underside of the firewall. This will keep them from leaking and throwing off after.
- Now pour a glass of water down the vents in front of the windshield.
- Watch where the water runs out. Hint: It should not come into the car!!
- Water should run out the bottom area of the rear part of each front inner fender
area.
- Water should run out the upper front inner fender area from the bottom of the cone
shaped thing that's actually called the "Trumpet."
- Water should run out of the 2 sheilded ports that are just behind each front Displacer
tower.
If you have rust holes in the under dash area and water is coming in through them, and/or
if the lip around the heater opening is rotted away, there is a way to fix it:
- Dry the area with compressed air really well and let it sit overnight to make sure
it's dry.
- Get a bottle of some sort of rust convertor....."Rust Mort" is a product that I've
used. I buy it at the local bodyshop supply store. There are other brands too.
- Get a large syringe of some sort. I use a syringe that comes in a package of
BBQ sauce.
- Load the syringe with the rust convertor and squirt it in through the vent openings
in front of the windshield. Squirt in from the heater box opening inside the car.
- Let it dry as recommended.
- If you have rust through holes, buy some 3M Automotive Caulk (never use a
silicone based caulk on a car. It will rust the metal like crazy.) Use the bodycaulk to fill in the rust
holes that you've now treated.
- Buy some "Fuel Tank Reliner" compound. I use a product called "Red Kote" and
I have also used a product called "Johnson's." Both are available at radiator repair shops or at places that repair
fuel tanks. Also sometimes available at small airports that have maintainence hangars.
- Load the syringe with the fuel tank reliner and squirt it in all over the place,
just like you did with the rust convertor.
- Let it dry as recommended.
- Check your work by putting a towel over your head and using a really bright flashlight
to see way down into the fresh air well.
Once the fuel tank reliner has dried you're ready to do another leak test with water.
If you still have leaks, and/or if you still have rust holes, you may decide to use more 3M Automotive Body Caulk in the holes
and then repeat the fuel tank reliner treatment a second time. This will usually completely fix the leaks.
When it's all done, use a nice spray-on rubberized undercoating and coat the entire underdash
area. It will make your repairs look very nice and it will help deaden the sound of the engine resonating on the firewall.
This is a good time to put down a lot of sound deadener on the firewall too. Products
like "Fat Mat" and "DynoMat" work wonders here!
Some tips from a good friend and fellow America owner:
"Oh man. I cleaned "Minty's" clogged vent. I have pictures of the leaves
and other things I
vacuumed up!!! Holy cow. There was a ton of it. I
had no idea. You really must stress to the people out there with
AAs. My
bulkhead seems ok, a little surface rust, very slight, but we live in
sunny CA! I tremble to think of those
back in the midwest and east
coast!!! Thanks to you for such a great tip. It was invaluable!!!
A couple things I
did to make it easier for me, and I have pictures
I'll send in
1. Use a wire coat hanger to break up the leave as most have been
sitting since
the car saw it's first fall! It really helps, and gets
into the crevices.
2. For the long
nozzle blower, I noticed the nozzle shaft was too wide-
so I took some thin tubing about the same diameter as the nozzle
shaft,
and took some bailing wire and fit it inside the tube- this helps to
stiffen the tube, and you can bend it to
suit. Then I attached the hose
to the end of the tip of the nozzle. This hose fits between the grille,
and is positionable.
VERY helpful.
3. I blew air from the center out to each end while I had the vacuum
nozzle
wedged in the hinge hole and it would suck the leaves as I blew
them it's way.
4. Big help
as well, was a 1.25" dia. (or close) hose to the end of the
vacuum nozzle. I taped it. Cheezy, but you only need it for
30 minutes,
so who cares? I was then able to feed it straight down the hinge hole,
and towards the center of the
grille drainage area. This got a lot of
stuff I would have otherswise missed. Clear tubing from Home depot
helps so
you can see if something gets stuck inside!
That's what I did! Much improved drainage and a little leakage at the
heater
but I haven't pulled that. I will.
Just a few tips that helped me."
Chris Sanchez, Sacramento, CA
Sound Deadening:
Sound deadening material is really worth the effort. There are many different styles of material to use from padding available
at upholstery shops to brush-on and spray-on coatings available at body shop suppliers and auto part stores.
-For
the interior sheet metal of all body panels and the floor, I like to use the tar based brush on coatings. The spray-on rubberized
coatings work well too, especially if you put on serveral layers.
-Under the carpets, I like to use the thickest
jute based padding (instead of the foam type pads used under house carpets) which is nearly 5/8" thick and very heavy
duty. You can stick it in place using 3M spray glue.
-Coating the insides of the front and rear fenders really
keeps rocks from chipping away at the paint, or making dents from the inside out.
-If you are willing to take the
time, you can really make the car nice sounding inside. The doors close with a nice thump and the car is much quieter overall.
Hood Closing Pads:
-The rubber pieces on these cars are now approaching 30+ years old, so not only are they beginning
to deteriorate, but new pieces are getting difficult to locate.
If the rubber pads that the hood closes against are
missing, not only does the hood not close right, but it rattles when you're driving.
Fellow Californian, Dennis,
has found some exact replacements while restoring his America. He found them at an ACE Hardware store and they are identified
by part number:
B322 3/8" Knock Outs
Dennis says they are an exact replacement.
Thanks for the tip Dennis!
Glass Installation and/or Re-sealing:
As I mention above in my section on leaks, the glass seals are very important. The big leaks
come from the lower corners of the windshield (called a wind screen in England) and the back window (called a back light or
rear screen in England).
If your seals are still soft, they can be glued in place to stop all leaking. If they are new,
I would also recommend gluing them in place during the initial installation.
If you are re-sealing old rubber gaskets, then you can also replace the faded nasty looking plastic
lock strip as well. These are usually burned black from the sun, but they should be bright and shiny chrome! The
car will look 100% better with new chrome lock strips and the good news is that this material is generic and any glass shop
can supply it, or sell you a whole roll of the stuff for about $20.
Now, let's get into the task of sealing rubber window gaskets.
But first, I want to emphasize that I pay the pros to do my glass work. They work cheap.
They come to your door. They generally do excellent work. And, if you try to do it yourself and either break the
glass or do some other damage, you will be kicking yourself in the rear for a long time. (It only took my breaking of a brand
new $200 VW windshield to learn my lesson!)
Why do I say this?
Well, I know a guy who chose to do his own glass. He purchased brand new repro gaskets for
his 1100 which was freshly restored. He bought what he thought was the correct "urethane sealer" and started the
installation process. As I was told several hours later, via a very angry email, he had urethane sealer all over
his hands and couldn't get it off. He had urethane sealer all over the newly painted car and couldn't get it off.
He had urethane sealer all over the new gaskets and couldn't get it off. On top of that, he had taken the "ruined' gaskets
and the glass back out of the car. So, not only had he gotten nowhere, he'd taken about 5 steps backwards.
Now you may be saying, 'Why didn't he wear gloves?' 'Why didn't he mask off the car?'
'Why didn't he get the proper urethane?' AND, 'Why was he mad at you?'
Simple, from 2,000 miles away, it was much easier to blame me than to take responsibility for what
he'd done. His further emails angrily informed me that it was my fault, the restoration had now taken 3 extra
months to complete, and hundreds more dollars. He'd had to throw away the gaskets, and even 3M's tech department couldn't
help him get the urethane off the painted surfaces of his car.
Now for my initial thoughts about glass installation and resealing.
- Have it professionally done.
- Stick around, it's fun to watch them do it and you may learn to do it yourself eventually.
- There is no substitute for the use of the proper materials, proper tools, and proper safety precautions
(for both you and the car).
Here are the steps with some photos to show how it's
done.
- Mask off right up to the edge of the gasket. Do it just like you were going to paint the gasket.
Use the blue masking tape, as it releases much easier, especially after sitting in the sun.
- Remove the lock strip. Take a thin screw driver, pick up one edge of the lock strip and then
just pull it right out of the rubber. It comes out in seconds.
- Use your fingers to gently lift the gasket away from the glass and body all the way around.
This will make getting the tip of the caulking gun under much easier.
- For cryin' out loud, wear gloves. Do I really need to say this? No.
- Use the proper urethane sealant for glass. GET THE PROPER SEALANT!!!! You want the stuff
that dries in 24 hours. Not the fast dry stuff that you might get from an auto parts store......as was used by the gentlemen
in the story above.
- Squeeze out the sealant around both the glass and car body. It doesn't take much and the more
you use, the more you'll be wiping up in a few minutes.
- Spray the gasket with window cleaner as lubricant and install the new lock strip. It takes a
special tool to glide the lock strip in place.
- Using a plastic spatula or similar item, begin "scooping" up all the excess sealant.
- Once all the big goop has been scooped up, you can start wiping up the remainder. Use an automotive
quality solvent that's designed for use on nice paint. This and paper towels will remove most of it. Follow
with "Handy Wipes" or similar.
- When you are saticfied that you've gotten it all clean, peel off sections of your masking tape and
re-clean those areas. Again, the plastic tool, the solvent, and the handy wipes will be your friend.
- Once you have all the sealant cleaned up you are done.
- Any sealant you didn't quite catch will peel right off the paint or the gasket in a day or so once
fully dried.
- Let it cure for 24 hours before getting it wet.
That's it!
| Ready to begin |

|
| Masked off & old lock strip removed |
| All sealed up and pretty |
|
| Sealant in and new lock strip being installed |
| Finishing up |
|
| Peeling of the masking tape and then a final wipe down |
| Available at automotive glass shops |

|
| This is the proper sealant to use |
Glass Date Coding:
-You can come up with a rough date for the production of your America by using coding of the
"Triplex Toughened" insignia on the car's window glass. These insignia are etched on each piece of glass and the date
code can be "de-coded" using the following examples:
1) The year the glass was manufactured can be determined by looking at the
placement of the dot under the word, "TOUGHENED". The position of the dot only indicates the last digit of the year.
As seen in the example below.
T O U G H E N E D
. .
. . .
. . .
. .
1 2
3 4 5
6 7 8
9 0
So, if your "TOUGHENED" insignia looks like this:
TOUGHENED
.
you have glass made in 1970.
2) The month the glass was manufactured can be determined by looking
at the placement of the dot or dots over the word, "TRIPLEX". As seen in the example below:
.
TRIPLEX = January
.
TRIPLEX = February
.
TRIPLEX = March
.
TRIPLEX = April
:
TRIPLEX = May
: .
TRIPLEX = June
: .
TRIPLEX = July
: .
TRIPLEX = August
. :
TRIPLEX = September
. :
TRIPLEX = October
. :
TRIPLEX = November
:
TRIPLEX = December
3) Here's an example for a June 1970 car:
:.
TRIPLEX
TOUGHENED
.
4) Here's an example for a March
1969 car:
| Sample Date Code Insignia |
|
|
| Shows a date of April 1971 |
BODY WEATHER STRIPPING:
REPLACING THE DOOR SEALS:
Unfortunately, the door seals for our
cars are "NLA," (no longer available) and we're faced with finding another suitable seal. Generally that has meant using
the generic seal sold by places like Woolies Trim in the UK http://www.woolies-trim.co.uk/
Using this generic door seal, #266 from their catalogue (if you want the version with the herringbone
pattern in the black vinyl part that press over the body panel) causes the doors to shut horribly. They have to be slammed
or if you adjust the striker on the body, then the door won't shut flush with the body anymore and sticks out somewhat.
I
recently put new seals on a car I was restoring. I ordered them from Woolies on a Tuesday and they arrived
that Saturday. £17.64 for 24' of #266 and £22.36 for postage. That came to about $77.00. You can't beat
that service!
As I installed the seal starting from the bottom and moving forward, I would do a length of it, then
shut the door to see where the door hangs up on this stuff. All was fine and the door shut perfect until I got the seal
installed past the door striker. After that, the door had to be slammed.
This car has a perfect body and
I didn't want the doors sticking out once shut. So, I looked at how the seal fit and what it was doing to the door.
Then I decided to bend the flange of the body inward away from the door, just in the area of the striker plate.
I used
a gasket scraper that has a 1" wide thin chisel type of blade that comes up to a screwdriver type handle. This fit nicely
between the flange and the striker. I then simply pryed the flange inward along the entire area. I used a big
crescent wrench (adjustable jaw spanner) to grab the flange in the areas about an inch or so above and below the striker.
With the Woolies seal back in place you can't tell that the flange has been altered. The doors shut perfect!
They take a tiny bit more effort than before, but they don't stick out and really shut nice.
Hopefully this will
help some of you out.
REPLACING THE TRUNK LID SEAL:
The trunk lid seals came in 2 styles. The 1968 and 1969 year model cars
used the MK1 style seal which glues to the underside of the trunk lid. The 1970 and 1971 year model cars used the MK2/Mk3
style seal that presses onto the flange of the body around the trunk opening. This seal is officially called the "MKII/MKIII
Boot Aperture Seal." It can be ordered from Earlpart or Trevor Jones, both in the UK.
In my opinion, the later MK2/MK3 seal is the only way to go. It looks clean,
seals very good and is easy to install.
If you're using it on an early car, you'll have to adjust the striker bar at
the bottom of the trunk opening by raising it a bit. Being a bit taller than the original seal, the later seal will
hold the trunk lid just slightly higher off the body. So, loosen the 4 bolts that hold the striker bar in place and
slide the striker bar upward so it can engage the trunk lid sooner. Otherwise, you'll really have to slamb the lid to
get it to catch. After the seal settles a bit, you can readjust the striker to a lower position and the trunk lid will
be held against the body a bit closer.
REPLACING THE REAR QUARTER WINDOW SEALS:
The rear quarter window seals are also no longer available. However,
once again http://www.woolies-trim.co.uk/ comes through with a nice seal #265A. You'll need 15 feet of this to do both windows. It simply presses
onto the body flange and can be installed in minutes without removing the window, or even undoing the window's latch
from the body. Simply open the window normally, pull of the old seal, press on the new seal. The ends of the new
seal should meet right next to the side of the seat back. That hides the seam from view and is how they were
originally installed.
|