Cooling System:
The America and all other ADO-16's, as well as the Mini (ADO-15), use a radiator that is turned
sideways to the airflow entering the engine compartment. Not a very good idea if you want to keep an engine cool.
If that weren't enough of an issue, the radiator fan mounted on the front of the water pump, actually pushes air through the
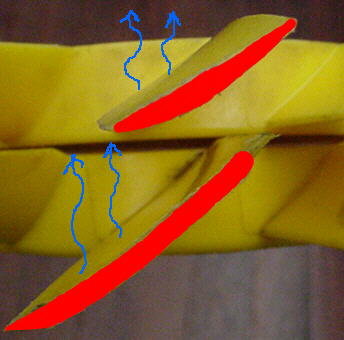
radiator from the engine side. Thus, airflow comes into the engine compartment through the front grill opening and is
then blown through the radiator and out the left inner fender over the left tire. An additional problem is that since
the fan is basically "sucking" air from around the engine block (the back side of which has a cast iron exhaust manifold)....the
air moving throught the radiator is already hot. This is especially critical when you're stuck in stop-and-go traffic,
or climbing a long grade at a slower speed. Engine temps begin to rise, and that increases the tempurature of the air
that is blown through the radiator.
All this aside, the system does work, even in it's most stock configurations. However,
there are plenty of improvements that are both economical and easy to perform. Thanks to the survival of the Mini,
there are upgraded radiator fans available, as well as upgraded, "High-Flow" water pumps. Both are well worth the money
and effort.
An 11 blade plastic fan is available which has 1-1/2" wide fan blades. Approximately $30.
The original fans usually had 1-1/4" wide blades and are less efficient. Especially the early metal fans found on the
1968 and 1969 models.
A 6 blade metal "Tropical" fan is also available. These make a bit more noise, but they move
a lot of air.
A note on fan blade installation:
The concave side of the fan blades face the radiator.
Like this: (<---------This side toward radiator!
The "High-Flow" water pump has a cast impeller that is almost a 1/2" deeper than the standard water
pump impeller. Plus, it has a closed back surface so it doesn't cavitate at higher revs. Approximately $40.
I have installed both (the upgraded fan and waterpump) on my own car, and am amazed at the difference.
Now, no matter what the driving conditions, high speed freeway, stop-and-go freeway traffic in Los Angeles, climbing
long grades, long hours of continuous driving, the car stays at normal operating temps. I've had it in as high as 105*F
weather, on the freeway and in stop-and-go traffic, and it did fine.
Diagnosing Overheating:
If you are trying to diagnose an overheating problem, as in all diagnostics, start simple.
-Verify that the coolant in the radiator is actually getting as hot as the gauge says.
-Use a cooking thermometer that is properly calibrated to check the coolant tempurature. To
calibrate, combine ice and water in a glass with the thermometer. Let stand for 10 minutes. Check thermometer's
reading. It should read 32*F because ice and water will maintain that tempurature. Adjust the nut on the back
thermometer to move the needle to read correctly.
-Make sure that all tune-up related items are dialed in.....ignition timing....fuel mixture....valve
timing.
-Make sure you don't have a brake caliper or rear brake shoes that are hanging up and staying "on."
-Make sure that the temp sensor in the cylinder head, near the #1 Spark Plug hole, has a red colored
insulator in the body of the sensor. If it's black or green, the gauge in the dash will always read high. Guess
how I learned this?
-Make sure the fan is on the right way. See the above diagram. The fan will still blow
air in the same direction, but it will be much less efficient.
Radiator Cap & Coolant Tank Cap:
-Make sure you have the correct radiator caps installed and that they are in the right positions. The "Blanking"
Cap goes on the radiator. The 13lb. pressure cap goes on the coolant recovery tank down on the front valance.
If these are reversed or, their seals are bad, the cooling system's "Thermo-syphon" will not work and the radiator will
continually loose coolant. Sounds silly, but it's actually a big deal on these cars. Remember, you're only working
with 1 gallon of coolant and a radiator that is just big enough to do the job. Any deviations will cause problems.
-Don't use more than about 25% coolant mix with water. Unless the car will be submitted to
freezing tempuratures. Any coolant to water ratio past 25% will hinder the water's ability to dissapate heat.
The cooling system uses 1 gallon, so mix 1 quart of anti-freeze with 3 quarts of water. I like to use distilled water.
Less minerals to corrode the radiator.
-Back flush the radiator and heater core with some high pressure water, from your garden hose.
Flush both until the water comes out clear.
Thermostat:
-Make sure that the engine thermostat is rated at 180F/80C. If it's of questionable age, replace
it. They are cheap and they are the same size as Chevy's 350 V-8 engine, so you can get a thermostat anywhere.
Try to find the "Mr. Gasket heavy duty/high flow" thermostat shown above. It's about $13 and well worth getting.
Email me if you can't find one.
-Check for a blown headgasket. The easiest way (if you don't see air bubbles in the coolant
with the engine running) is to go to shop that has a exhaust gas sniffer. Have them "sniff" the steam coming out of
the open radiator filler neck. If their sniffer picks up exhaust gas fumes (Carbon Monoxide and Hydro Carbon), then
you have a blown gasket. All radiator shops will also have a chemical "sniff" test using a dye solution.
If everything is in order and you're still experiencing overheating, then I'd say it's time to invest
in the "High-Flow" water pump and the improved fan. Also, since the radiator has to be removed for this job, I would
strongly suggest replacing all the coolant hoses and consider having the radiator "rodded" out at the local radiator repair
shop.
Always work on the cooling system as just that......a system. It's really the last thing you
want to have any issues with, even if you only drive short distances.
Tempurature Gauge Readings:
If you still have the stock in dash mounted tempurature gauge, maybe you'd like to know what the
needle positions correlate to in actual tempurature.
The beginning edge of the white box is approximately 120*F
The middle of the white box, needle pointing straight down, is 175*F
These readings were sampled using a calibrated thermometer. I have not yet tested the reading at the upper end
of the white box, but will post it when I do.