|
Practice 5 ...... Using the Thesaurus (Save Only)
1 ) LOCATE THE WORD TO BE CHANGED
Double-click on the word "major" in the sentence which begins "A major part of successful
treatment" near the top of page two.
2) EXECUTE THE THESAURUS COMMAND
From the Edit menu, drag down to the Writing Tools command. From the submenu, select the
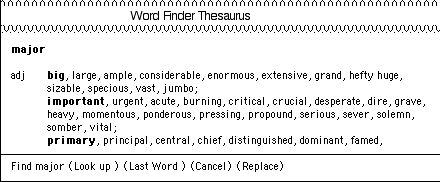
Thesaurus command. The dialog box is displayed:
3) SELECT THE DESIRED SYNONYM AND REPLACE THE WORD
a. The definition of "major" that is being used in the sentence is most similar to "important." From
this group of synonyms, click on "vital" to select it.
b. Click on the Replace button. The word "major" is replaced with "vital" and the box removed.
4) CHANGE THE WORD "COMMON"
a. Double-click on the word "common" in the description for course 101 to select it.
b. Execute the Thesaurus command by pressing Shift+Command+Y. "Common" has many meanings.
c. Scroll through the list to view the different synonyms.
d. Click on the meaning "typical" near the end of the list and then select Look up to get another list of synonyms.
e. Select "prevalent" from the list of synonyms and click on Replace. The word "Common" is changed
to "prevalent" in the document.
5) SAVE THE MODIFIED COUGAR UNIVERSITY
Practice 6 ... Setting and changing paragraph indents (SAVE ONLY)
1) CREATE PARAGRAPH INDENTS
a. Place the cursor in the paragraph which begins "The modern world around us...," the quote below the faculty
listing at the bottom of page 3.
b. Place the mouse pointer on the left indent marker ( ) below the Ruler. Drag the marker to the 2 inch point on the
Ruler. Release the mouse button and the current paragraph is reformatted with a 1 inch left indent.
c. Drag the right indent marker to the 7 inch point. The paragraph now has a right indent of 0.5 inches.
d. Move the cursor out of the quote paragraph. Note how the position of the indent markers change.
2) CHANGE THE LEFT INDENT
a. Move the cursor back into the quote paragraph.
b. From the Format menu, select the Paragraph command. Note the "0 in" measurement in the Right indent box.
This is displayed here because it is the right indent marker's position on the Ruler relative to the left margin: 6 + 1 (left
margin).
c. Type 0.75 in the Left Indent box. Select OK. Note the position of the indent marker on the Ruler
3) SAVE THE MODIFIED COUGAR UNIVERSITY
Check - Your screen should be similar to:
Practice 7 ... Create a bulleted list using hanging indents. (SAVE ONLY)
In this Practice you will create a bulleted list in the course description of COUGAR UNIVERSITY using hanging indents. Start
APPLEWORKS and open COUGAR UNIVERSITY if you have not already done so. Use the Show Invisibles button on the Shortcuts palette
to display special symbols if they are not already displayed.
1) SCROLL TO THE COURSE DESCRIPTIONS
Scroll to the course descriptions and place the cursor in the paragraph describing course 101, which begins "A comprehensive
survey...."
2) SET LEFT AND RIGHT INDENTS
a. Using the Ruler as a guide, drag the left indent marker to the 1 3/4 inch mark.
b. Drag the right indent marker to the 7 1/4 inch mark. The paragraph is now indented 0.75 inches on the left and 0.25
inches on the right.
3) CREATE THE HANGING INDENT
a. Make sure that the cursor is still in the course 101 description paragraph.
b. Drag the first line indent marker (the line below the left indent marker) towards the left, to the 1 inch mark, creating
a hanging indent:
Note the shape of the first line indent marker. This is not apparent when the first line and left indents are the same.
4) ADD THE BULLET
a. Move the cursor to the left of the first character in the current paragraph, the "A" in "A comprehensive
survey...."
b. Hold down the Option key and press the 8 key to create a bullet.
c. The bullet must be separated from the first word in the paragraph. Press the Tab key to insert a tab between the bullet
and the "A." This aligns the text in the first line with the rest of the indented paragraph. The course description
paragraph is now a bulleted list:
5) BULLET THE NEXT COURSE DESCRIPTION
a. Place the cursor in the paragraph describing course 102, which begins "A complete and systematic.... "
b. From the Format menu, select the Paragraph command. Indents will be set using the Paragraph dialog box.
c. In the Left indent box, type 0.75. Type -0 25 for the First line, and 0.25 for the Right indent. Press OK to remove
the dialog box.
d. At the beginning of the paragraph, type a bullet (Option+8) and then press Tab to align the text. The course description
for 102 now has the same format as course 101.
6) FORMAT THE REMAINING COURSES
Follow the instructions in step 5 to format the seven remaining course descriptions.
7) SAVE THE MODIFIED COUGAR UNIVERSITY
Save the file. The bulleted course descriptions will be retained in the document.
Practice 8 ... Creating a Footnote (SAVE ONLY)
In this PraCOUGAR UNIVERSITY if you have not already done so. Use the Show Invisibles button on the Shortcuts palette to
display special symbols if they are not already displayed.
1 ) LOCATE THE TEXT TO FOOTNOTE
The quote by Dr. Itchee in the Faculty description (below the faculty list) needs to be properly referenced. Place the
cursor at the end of the quote, just after the period ending "skin care specialists."
2) EXECUTE THE INSERT FOOTNOTE COMMAND
From the Format menu, select the Insert Footnote command. APPLEWORKS inserts a superscripted ''1" in the text and
moves the cursor to the bottom of the page where the footnote text may be entered. Note the horizontal line separating the
reference from the rest of the text.
3) ENTER THE FOOTNOTE TEXT
Type the following text:
Dr. Phineas Itchee. "Keynote Address." 15th Annual RASH Regional Conference Proceedings. Chicago: Crain Press,
2003. 5-12.
4) FORMAT THE FOOTNOTE TEXT
a. Highlight all the footnote text.
b. Change the font to Geneva to match the rest of the text in the document.
c. Highlight the conference name, "15th Annual RASH Regional Conference Proceedings. "
d. From the Style menu, select Italic.
5) SCROLL THE DOCUMENT
a. Move the l-Beam pointer so that it is in the paragraph above the footnote.
b. Click the mouse to place the cursor.
c. If it is not currently visible, scroll to the end of Dr. Itchee's quote. Note the superscript "1" that APPLEWORKS
has placed at the end of the quote.
6) EDIT THE FOOTNOTE
a. Scroll down until the footnote is visible.
b. Move the l-Beam pointer into the footnote and then click the mouse. The cursor is now in the footnote.
c. Highlight the "th" in "15th."
d. From the Style menu, select the Superscript command.
- The footnote should look simliar to the following:
1 Dr. Phineas Itchee. "Keynote Address." 15th Annual RASH Regional Conference Proceedings Chicago: Crain Press,
2003. 5-1 2.
7) SAVE the modified COUGAR UNIVERSITY
Practice 9 ... Inserting a picture and adding a time stamp.
(SAVE AND E-MAIL THE COUGAR UNIVERSITY DOCUMENT TO YOUR INSTRUCTOR).
In this Practice you will insert a picture and add a time stamp to the document's header. Start APPLEWORKS if you have not
already done so and open COUGAR UNIVERSITY .
1 ) INSERT A PICTURE
a. Move the pointer so that it is just to the left of "Cougars" in the first line (the title) of the document.
Click the mouse to create an insertion point.
b. From the File menu, select the Open command. Open the Cougars U LOGO file from your FIRST CLASS / STUDENT CONFERENCES
/ ENVERCK ICT8 Conference directory.
c. Select the graphic that you would like to use as the logo for Cougar University.
d.Copy and then paste the graphic into the COUGAR UNIVERSITY document.
e. Press the Return key to move the title to the next line. Note how the graphic is centered because the paragraph is
formatted for center alignment.
2) CHANGE THE SIZE OF THE GRAPHIC
a. Move the l-Beam pointer so that it is on top of the graphic.
b. Click the mouse button. The dotted lines around the graphic indicate that it is selected.
c. Place the pointer on the black box in the lower-right corner of the graphic. The l-Beam pointer changes to an arrow
shape.
d. With the arrow-shaped pointer on the size box, press and hold the mouse button. Drag the mouse. Note how the dotted
lines move with the mouse to indicate the size of the graphic. When the graphic is slightly larger, release the mouse button.
3) INSERT THE DATE AND TIME IN THE HEADER
a. Scroll to display the header in page 1 of the document if it is not already.
b. Place the l-Beam pointer just to the right of "Information" and click the mouse to create an insertion point.
Press the space bar to enter a space.
c. From the Edit menu, select the Insert Date command. The current date is inserted at the current cursor position.
d. Type a space to separate the date and time.
e. From the Edit menu, select the Insert Time command. The time is inserted at the cursor.
f. Drag the pointer over the date and attempt to highlight just the day. Because the displayed date and time are place
holders for the actual date and time, it is impossible to highlight just a section - either the entire date or time is highlighted
or nothing is.
4) DEMONSTRATE HOW THE TIME STAMP IS UPDATED
a. From the File menu, execute the Save command to save the file.
b. The date and time will be updated each time the document is opened or printed. Carefuily note the current time, especially
the minutes.
5) SAVE AND** E-MAIL YOUR "COUGAR UNIVERSITY " DOCUMENT FOR GRADING
Once you feel confident that you have completed this lesson, e-mail your document as an attachment to your instructor
at the following address:
aujla_m@sd36.bc.ca
Your document should include the appropriate file extension in order for the formating to remain in transmission.
For sending documents from Apppleworks, use the extension ".cwk". A correct file name and extension would look
similar to:
L5cougaruniversity.cwk
Notice that any spaces in the file name have been removed and an indicator of which lesson (L5) has been added.
The assigned value for this assignment will be returned once it has been graded.
6) Close COUGAR UNIVERSITY .
|